Hey All! How's your week going? Well I hope! I almost didn't make the post tonight. Time got away from me! Lots to share in this post, so I'll get busy!
Many of you have encouraged me to try out again for the DT spot over at House Mouse Monday Challenge. So, I've thought about it and have decided to try out again. I so love the HM images, and their design team is simply awesome. It would be an honor to be a part of that group. So, the first thing I need to share is my card to show them what I can do. Here it is:

I've used this image one time before and this time I've used it to create a more Fallish feel and to use it in their challenge this week which is to use buttons. See 'em there along the bottom under the image? They are little bone buttons. I used my ccp/oms to color the image. The leafy background paper is from the Paper Studio. The bow is the final result of the mini tutorial at the end of the post. Here is a close up of the bone buttons:

But before we get to the tutorial, I have another project to share with you. I had been seeing these really neat boxes all over the internet and they kept referring to the "ones found on SCS". I did no less than 5 different searches on SCS and found nothing like I was looking for. So I winged it and came up with my own. Here are 3 that I have completed:

What do you think? I really like how they came out. Take a look at the pics below of each, then I'll give you the deets:


Here are a couple of close ups:


The picture below is what it looks like opened:

As you can see, they are perfect for holding 2 of the single Reese's peanut butter cup packages. The box itself is an origami box folded from an 8 1/2 X 8 1/2 piece of Bazzill card stock. The box size ends up being 3" X 3" X 1 1/2 ". The bottom and top are made with my Nesties Label dies (the largest die in the set). The skull is an Inkadinkado stamp as is the spider web. The spider is a MS punch, and the witch is also a stamp by MS. I added ribbon and bling to decorate. The bottom is attached to the box with red line tape and the lid is attached to a strip of card stock and sandwiched between two identically die cut lid pieces so that it is hidden and seamless. There might be an easier way, but this is how I figured it out. I've decided on future boxes that I'll decorate the inside lid more, but I had already attached them before I thought of that. So I just stamped the sentiment, which by the way is a $1 stamp.
OK, now to the tutorial I promised. I came up with this idea out of frustration. The Bow Easy (you can purchase one from Sharon Johnson - go HERE) does help make consistent bows of several sizes, but that is all. . . a bow. . . which you have to use glue dots of dimensionals to attach to your project. Well, when I would attach them to ribbon, it didn't look like it should. So I came up with a way to slide a piece of ribbon in during tying process so that your bow looks like it was tied all in one piece. I know, it sound confusing. Pictures are worth a thousand words:

I started out with two pieces of ribbon. The first is 24" long (for the bow part) and the second piece is the piece that the bow will be tied to. I'm using the largest part of the Bow Easy for this bow.

Start the bow as directed by the Bow Easy directions:

You will go to the part where you put the ribbon through your loop as shown above.

Once you've gotten to this part (the part right before you tighten the bow itself) flip the Bow easy over, and you should see this above.

This is where my "tip" begins. Take the second piece of ribbon and slide it through the loop on the back (above) so it looks like this below:

At this point, flip it back over and continue making your bow as usual.


Your bow is now tied and should look like this picture above.

This is what it looks like (above) when you slide it off of the Bow Easy. Your bow is now tied to the other extra piece and it stays in place.

Trim your tails.

You can see above that all you have to do now is attach the extra piece you added to the bow by wrapping each end and taping them to the back of the matted piece. And as a reminder of the finished use of the bow my card again below:

Took a bunch of pics to show that, but believe me, it is very simple to do if you use the Bow Easy. My bows are getting better, but I'm still in the "novice" stage. But I do hope this tip helps those of you who have the Bow Easy.
All righty then. I'm done and tired of typing! LOL I'm sure you are tired of reading!
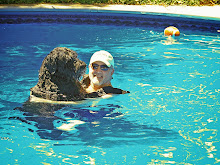
I have to say one more thing. Don't forget to look at the "pic of the week" below. It is the most beautiful FUNGUS that I have ever seen! LOL I have never seen anything like this, and the first thing that struck me about it is that it is perfectly colored for not only Fall, but for Halloween too! It reminds me of a smashed pumpkin! I took this photo this week in a park very near my house.
Thanks all for stopping by. I hope I made it worth your while. I try hard to give you something in each post, and I hope I did this time as well. Again, thanks for all of your comments and support. It means the world to me! Take care of yourselves! I'll be seeing you on your blogs~
Curt O'Brien
"God please help me be the person that my dogs think I am."


46 comments:
WOW!!!
Absolutely fabulous creations, Curt.
First of all your HM card is amazing. The fur looks so real, how you do that with pencils is beyond me!! Love the papers and little bones too. Good luck with the DT spot...you would be perfect.
The Halloween boxes are AWESOME...fabulous detail. I am definitely going to give these a try...TFS the details.
Great pic of the week, I don't think I have ever seen a fungus quite like it!!
Have a great day...
Karen x
Holey Toledo...this is your best yet!!!!!
Your post are all Amazing Curt!!
The HM card is Gorgeous!!..fabulous coloring, layout..and accents!!..I love the bones and ribbon!!...Good Luck!! they would be so Lucky to have you on their team!!
I love your Spooky Boxes..every one of them is Fabulous!!
Wow!!...I have never seen a fungus like this...Incredible..and Gorgeous!!
Keeping my fingers crossed for ya!!..Hugs Ila
While the card and boxes are great, it's the new ribbon technique that has me in awe. It's perfect!! I can hardly wait to try it! You are "gooder than good!"
Elaine Moore mtn.moven.faith@comcast.net
Hi Curt Brilliant post as always
That card is awesome and HM would be mad to not have you!
Super boxes, Im impressed as I am with the bow, although I dont have one of the shapey thingies to try it lol
Have a good day/week
mandi x
Hi Curt
pleased to read you are going in for the DT post again, your hm cards are awesome. The boxs are brilliant llok really cool, as does your bow makes life a lot easier doing it like that. Great fungi piccie i took one similar last year fascinating stuff. Good luck with the DT post i have eveything crossed for you. sue.x
Hi Curt, love your card, and that adorable image - perfectly coloured!! Those bone buttons are fabulous and oh so cute.
Great tutorial on bow tying (I hate commenting - my wish list grows by the minute - now a bow tying template is added lol)
Your boxes are fabulous and if you find the perfect way to attach the lids please let me know, I've tried several but am not entirely happy with any of them.
Good luck and fingers crossed with the DT call.
Thanks so much for playing along with us at HM&F.
hugs Heather xx
Love your card as always and you have my "vote"...hope they pick you...good luck! Great boxes, too...I haven't seen those yet...I need some Halloween ideas.... love the pic...I was impressed with the bow easy...another "tool" to think about!
Hi Curt! Love your House Mouse card! Good luck with the DT position. You are so great at making House Mouse cards! The Halloween box is really cute and thanks for the bow tutorial!
Curt, your card is wonderful, those bone buttons are the cutest things. They would be crazy not to pick you!!!!
Great boxes too. I love how you used the Nesties for the lid. Super Cute!
Thanks for the tip with the bow. Makes good sense and adds a lot.
Love your funcus picture. How beautiiful!!!! And, you are right the colors are perfect for this time of year.
Joan
Wow Curt, I was worried! Checked my reader out LATE last night (after the Cardinal's lost...again), and you hadn't posted! Whew... glad you did - I look forward to your Weds. Eve. Post! Can't say that I've ever seen fungus that looked like artwork before! Beautiful! And sir, your card so made me smile! I love your coloring, and DP, and those bones just ROCK!!! So glad that you are trying out for the DT again - maybe they'll have their eyes open over there this time!!! Outstanding work dear friend!
Wow Curt your boxes are card are just fabulous! I love that image and hope to find it someday. Now I want to try making the boxes you made as well, especially since I have that nesties die. Hope you make HM DT you like those little mousies as much as I do, unfortunately I have way too much going on to go for a DT! Well time for me to run again, got Noah's IEP in about an hour. OH and that Fungus is AMAZING, so glad you got a pic of it and u shared it with us!
Curt, you once again have blown me away my friend, your talent nad these sweet creations are awesome!!!!
that is the most beautiful fungi i have ever seen! your card is AWESOME!! if they dont choose you to be on the DT they are NUTS!! IMHO :0) thanks for the tip on the bows
I love, love, love the bone buttons ... they're P-awesome! Great job on the sketch/layout and your coloring is incredible. Good luck making the design team!
Your Halloween candy boxes are adorable too! Keep on stampin' on!
OMG, Curt do tell where can I get those bone buttons. They are so stinkin' cute & adorable like the card you made. I look at my artwork you sent me everyday at the office, wink, wink.....
And, those halloween boxes are just to die for! I love all of them!
Thank God you replaced that snake pic with some beautiful fungus. Like this one much much better.
If you need me to vote for your submission at the HM, just say the word.
Hugs,
Gina
I love the card and boxes. Thanks for the tip on the bow easy! Hope you make the HM DT this time, you do such great mousies! Your 'fungus' is so neat, I've never seen that before.
The House Mouse card is adorable! Good luck with the DT spot. Love your little halloween treat boxes!
p.s. The Halloween fungus photo is great too. I love the slideshow on the top of your blog too. Some really great photos in there!
Curt, this is just a fabulous card. Good Luck with the DT position. Thanks also for the bow tutorial. I've just purchased one of these bow easies but was wondering about the attaching part. Now I know!!
WOW! What an amazing job you did coloring that HM image! Those boxes are toooooo COOL! I've seen them around too, but yours are really great! Neato POTW...you find the coolest photo ops! HUGS!
I've said it before and I'll say it again - you are so talented and creative! Your HM card is adorable and I love those boxes. The bow trick is a keeper, too, thanks for the inspiration.
Curt, this is such a beautiful card! I love everything about it and your shading is gorgeous. You are indeed talented! Thank you too for sharing the tip with the ribbon - I must dig out my Bow Easy and use it!!
Good luck with your entry for the HM DT. Your work it fabulous and you would be a great asset to their team.
Those little bones are too cute.
Thanks for the bow tutorial. I have great difficulty tying bows (perhaps in part because my nails get in the way!). I've heard about the Bow Easy, but never 'saw it in action' before.
Amazing picture of your 'Fall' fungus.
Curt...love your little boxes, the fab. idea for the bow easy little dowah thingy, why didn't I think of that? and well this was a great post. I hope you make the team this time for the house mouse people. Happy weekend. Pat
Curt,
Love the card!!! I hope you make the team too....you are soooo talented....
Thanks for sharing the "tutorial" on the bow making, it looks so easy! I got to give this one a try!
The boxes look fab as well, what a 'treat' to get one of these!
Thanks for sharing!!!
Hi Curt! You've been creative again! I love the card - it should convince them that you are their #1 DT person!!! The little bone buttons are hilarious! Perfect!
The treat boxes are inspiring - I have that nestie and I'm going to make some TODAY! Thanks for the neat idea!
As for the bow tutorial - Wow! I'm keeping that one around as well - in my "tutorials" folder.
Thank you SO much!
Hugs.
WoW! The only fungus I ever find is nasty squished mushrooms ... that are usually crawlin' with ants! But this, this is beautiful!! What a great photo, Curt!
LOVE, love, love your card and all the fun details. Especially that beautiful bow ... I have a Bow Easy and pretty much gave up on it ... now, I'm definitely gonna try out your idea ... thanks so much for sharing your brilliance!
Okay. We MUST have a tutorial for those great boxes you made! They are picture-perfect and look totally professional ... I NEED to make some of these!
Thanks for always sharing your great ideas with us ... you da bestest!
~Hugs, Deb
PS: If they don't pick you for the HM DT, they're outta there minds!!!!! Good luck ... will be crossing airy-ding for you!
Yola, Curt!!!
The boxes you've created are really amazing! How great of a Halloween gift is that?! And I've always wondered how cardmakers make their ribbons look *perfect*!
Good luck with the House Mouse creative team -- I really believe HM is your signature. So, I know you'd love it with them!
And the photo is extraordinarily cool! It does look Autumnish!
Hope you are having a great weekend. Part of mine will be spent figuring out how to keep Georgie in the backyard! {my tri-colored papillion}
{xoxo} Juls~
Hi Curt!! As always some fabulous work and attention to detail. I love your shroom pic... Very pretty! We are Thanksgiving it this weekend with family and friends. I am waiting for my apple pie to bake.
Hope all is well with you!
Hi Curt - your card is awesome and I'll have to try your bow technique with my bow easy. Love the pic of the fungus!
Gad, Curt, you are always the genius when it comes to embellishments, and design too, of course!! I love those little bone buttons for the dog. Your tutorial just really explaned a lot of question I would have had just looking at it. What a much better way of doin ribbon bows than the tons of glue dots I have been using. Duh Me!!!
Your card is great. I would certainly vote you in! The candy boxes are wonderful, great idea. The bow technique you used is amazing, thanks. The fungus is great, never seen that color before. I love your blog :-)
I found your blog while blog hopping, you are super talented! I encourage you to never stop trying for DT's or anything you want, always put yourself out there. Your HM card is amazing, I wish you the best....have a great week!
enjoy *~*
What a sweet autumn card, and fabulous treat boxes! Thanks so much for the tutorial on creating bows. This explains why yours are so perfect! :)
Holy Smokes, Curt! I love your idea with the bow easy... AWESOME! tfs
And your creations are of course fabulous as always.
LOL on the fungus, but you have it down pat...it does look like Halloween colors. Love the boxes and that card is such a cutie...adding the baby bones, well that tops it!
Your HM cards are always adorable and I love the bone charm! The halloween boxes are fab! Great idea...filled with Reeses, my favorite! Thank for the bow tutorial too, great job!
Gorgeous card Curt. I am sorry to say that i never found your post when searching earlier and as much as i wanted to put you through to the final after admiring the work on your blog i couldn't do so UNTIL i was shown your post by a member of the DT - so happy now that i can say welcome to the final and good luck. Your next challenge will be posted later today. House Mouse challenge blog. x
Hey Curt...congrats on making the final round for the HM DT! I will be keeping my fingers crossed that you get chosen - you certainly deserve it. Your HM creations are wonderful.
Love your Halloween boxes. Too cute!
All of your work is beautiful...LOVE it. Good luck with HM. can you tell us what type of camera you use....your pictures are awesome........Thanks for sharing.
Congrats in getting to the fina 10/11! Good luck, like you, I am just excited to have made the first cut. I love House Mouse too
and like the other finalists, we all want this, but I will continue to join the challenge regardless of the outcome.
Hi Curt....followed the link from GK's blog to your bow tutorial...ingenius tip!! Your photography is beautiful and your HM card delightful! Enjoyed your blog :)
Kim Marie
Followed the HM challenge to see your card. It is wonderful and the bone buttons rock! I look forward to your final entry. Good luck!
Hope you win!
Fabulous card, Curt! I am crossing my fingers and toes for your spot on the HMDT~but don't think you need luck ~ your talent speaks for itself and this card is awesome!
Best of everything to you. XOXO
Hi Curt, I'm so glad Sharon linked you today! Gosh, I must sleep under a rock! This is my first time to your blog. Totally loving your Halloween treat boxes, way too cute! Love your card as well, the papers are gorgeous and your image is way too cute.
Thank you for sharing the bow tutorial with ribbon ends. Sometimes I struggle with just slapping a bow on the front of a card. You and Sharon have given us fabulous tips on bow placement, a great help for me with future designs!
Post a Comment