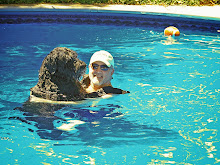
Hey All! Sorry I've been away so long. But, I have lots to share with you so I'll get started. Do you not love that picture up there for my header?!? Shotsy is the one with the rose in his mouth. He is so sweet. He will do anything that I told him to do. He looks like he has such "love" in his eyes, but in actuality, he was falling asleep. I had taken about 20 shots of them to get a good one and he was just plain tired. I love him so much.Please try to read through everything. I've included some good stuff that I wanted to share. You might want to grab another cup of coffee or your favorite beverage! LOL I'll start this post with the couple of cards I made, then get on to the news and other stuff I want to share!
The first card I'll start with is my entry into this weeks House Mouse Challenge over at House Mouse Monday Challenge. This week's challenge was to use paper piercing on your card. Here is my entry: You can click on the picture to see it in more detail. The piercing is in each corner of the image panel. This is such a sweet image. I love how he has buried his little face into the flower. When I look at this image, it reminds me to stop and smell the flowers. The paper is by Paper Pazazz. I stamped the image in Archival black, and colored it with my colored pencils and OMS. Used a corner punch for the corner slits. The dark green card stock is by Bazzill. I mounted the image panel with foam squares. Added the ribbon and done.Here is my second card:
 This is a thank you card that I made to send to Lisa who donated the Inchies squares to the blog candy I'm offering. Because she donated the Inchies, I thought I would use Inchies on the thank you card. I really LOVE this product. They are one inch squares and are made of artist quality matteboard. They take stamps so well! To learn more about them, click here. I stamped flower parts from larger stamps on these in Colorbox red ink, then embossed them with red ep. I matted them with black Bazzill card stock then mounted them on the card. I'm sorry, but I don't know who the paper is by or the stamps. I didn't look or write them down. I need to get better about that! Anyway, I stamped the sentiment, matted it on Bazzill card stock, added the black brads, then attached it to the card. I stamped the butterfly, embossed it, then cut it out and attached it with a foam square. Again, you can check out the Inchies here. You can also do a search at Splitcoast for "Inchies" and see all of the clever uses there are.OK, now for some news. The House Mouse Challenge Monday blog is looking for 2 new DT members. I've been encouraged to apply by one of the current team members. I've decided to try out! The application process will have me post here on my blog that I am applying and to post 3 samples of my cards. So, my next post will be the application. This would be fun, and it will be the first DT for me. So, keep your fingers crossed for me!Next on my list is an update for the Valentines for the Kids at Children's Hospital of Michigan. For those of you who have donated cards, you will remember that the hospital had asked Pat if she could come up with 1,000 cards for the kids. I am so excited to report that she has received over twice what was asked for!!! Can you believe it???? As of last week, she had collected well over 2,000 cards. Thank you so much to all of you for participating in this worthy cause. We all did a wonderful thing here! Remember, I'll be doing the random number thing for my blog candy on February 8Th so you still have time to sign up for it.Next, I found the most amazing crafter while poking around Splitcoast. So amazing in fact that I had to share her work with you. She does what she calls "Magic Boxes", and they are truly the most beautiful things I have ever seen. Do yourself a favor and go see her Splitcoast gallery here. You can also visit her blog here. I also read on her blog that she had sent one of her boxes to the Queen, and it is housed now in her private quarters. How cool is that? I just wanted to bring her to your attention. I am going to try one of these soon. I know I'll never come close to her talent, but I just have to try one of these gorgeous boxes.OK, almost done. . .I wanted to acknowledge a couple of RAK cards I received and hadn't posted yet. The first was from my good blogging buddy Danielle.
 Is this image adorable?!? Thanks so much Danielle!The next is from my very sweet blogging bud in Australia, Jane.
 I loved this card. The velum with stars lays over the 2009. It was the first and only New Years card I have ever received. And coming from Australia made it even more special. Thanks so much Jane!Second to last thing. . .I told you that you would need another drink! LOL Anyway, I was tagged by Laura Davis. I normally as a rule don't participate, but this was an interesting one and I've seen/read where others have been tagged with this one. The deal is, you have to go to "my pictures" on your computer, go to the sixth folder and then to the sixth photo. You then post it on your blog and describe it. So, I decided to play along. Here was my picture:
 LOL! I had forgotten all about this picture! This was after we had Gunther neutered and had his back dew claws removed. I'm even more embarrassed to let every one know that those are a pair of my old underwear that he is wearing! He is a little over 9 months old in this picture. As you can see, I cut out a hole in the back for his stubby little tail to go through. We put these on to keep him from licking his stitches. Believe it or not, he wore them with no problem. We, of course, had to take them off whenever he went out, but we would put them back on as soon as he would come back in and he'd run around and never try to take them off. You can see the bandages around his back paw too. He was such a great little guy through all of it.Finally, I want to thank all of you who have posted several awards for me on your blogs. I'll be adding them to my sidebar here on my blog. I'm both honored and humbled that you would think of me. As all of you know by now, I just can't bring myself to choose just a few of you to get them, so I just don't. I think you are all amazing, and I think you all deserve them. So again, thanks so much to those of you who nominated me. I truly appreciate it so much.Well, that is it. Sorry for such a huge post, but hey it has been a couple of weeks since I posted and had lots to say/share. Hope you thought it was worth your time. Don't forget to see the pic of the week below. I'll be seeing you on your blogs over the next day to catch up on what you've been doing!Take good care all! Thanks for being so wonderful!Best,Curt"God help me be the person that my dogs think I am."
Hey All! Hope you all are enjoying your weekend! We finally got a few inches of snow, so I took "my boys" out in it to play this afternoon. They love it so much! OK, on with the post. . . .I wanted to remind everyone that you still have plenty of time to get in for my blog candy drawing. You can find out the details on my previous post. Some exciting news however. . . I received an email from the owner of the company that makes Inchies. If you look at the previous post, you'll see that I used them on one of the Valentine Day cards. Anyway, she emailed me and said that she liked what I did with the card and the Inchies, and she wanted to donate a box of Inchies to the prize drawing! How cool is that?!?! So if you would like to know more about Inchies check them out at "Inchie Arts". Thanks so much Lisa!OK, now it is time for you to be kind and gentle. . .LOL Here is my first attempt at using Copics to color an image: I so love this image from the House Mouse Gruffies. I chose this image because it would be difficult for me to color using markers, and I wanted to challenge myself. Other than the pillow being a little too pink, I'm pretty happy with the results. What do you think? I love his paw pads. I usually don't like the color combination of pink and brown (popular as it may be), but I do kinda like it with this image. I used Bazzill watercolor card stock as the base, and the pink card stock is also Bazzill. I have no idea who did the printed paper, it has no name on the back. To go along with the theme of the "candy wrappers", I cut the corners out of dark chocolate brown card stock that I had ran through my paper crimper. I thought it gave the look of candy wrappers. I cut the scalloped circle and other circle with my Nesties and mounted the saying with foam squares. Here is a close up of the sentiment (more about the whole sentiment think in a minute):
 Here is what the inside says:
 LOL! Is that funny or what? I saw a similar sentiment on some one's blog months ago only they had a cookie theme on their card. I have always remembered this saying, and when I saw this image, I knew it would be perfect for the card.Here are the Copics I used (I've always wanted to show a picture like this LOL!)
 Here is the box of Copics that I won:
 I have one more card to share with you before you go. It is a Valentine card that I made. Here it is:
 Again, another House Mouse image. However, I altered this one a bit. It is supposed to have regular balloons, but I masked them out and used a clear stamp that was a heart in a circle for the balloons. This was a large image, so it was mounted on a larger card. I had a hard time deciding how to mat the image because there was so much white. So I cut four squares; 2 pink and 2 red and positioned them in the pattern you see above. I mounted those on printed paper and mounted all of that on the heavy card stock. Added some bling to the bottom and some photo corners and done. This was colored with colored pencils and OMS. I did this card before I got my Copics.One final project to share. My boys were just recently groomed and they came home with some cheap little bandannas that had the logo of the place that groomed them. The color was turquoise and was stunning next to their black fur. So, I promptly went to Hobby Lobby and bought two plain turquoise bandannas and stamped them with black paw prints. I used the Staz-on jet black ink. I think they came out great. Here are the boys modeling them for you:
 Don't the boys look like models out of a dog catalog? LOL I'm just a very proud Dad! They love to wear bandannas, and they have about 25 each. Are they spoiled????OK, that's it for now. Need to go get ready to go have some dinner at my best friend's house tonight. Hope you enjoyed the post. Can't wait to read your comments. Again, thanks so much for visiting! I have the best readers EVER! I'll be seeing you on your blogs tonight when I get back from dinner. Take care!Best,Curt O'Brien"God help me be the person that my dogs think I am."
Hey All! Hope your weekend has been wonderful and stress free! My post today is my contribution to Pat Adam's cause for the children at Children's Hospital of Michigan. Pat was given a very tall request by the administrator there. She asked if Pat could come up with 1,000 valentines for the kids to swap with each other and give to parents and staff. Yes, you read it correctly, 1,000. So I, along with a bunch of other stampers have committed to help with this huge request. So, today I will show you what I made to send. Stay tuned because I'm giving away some blog candy as well as several others if you choose to help with this worthy project.
I made a total of two dozen cards to send to Pat. I made several designs and several of each design. Here is my first one: I love this sweet image. It is a Stampabilities House Mouse stamp and this one is called "Love Bunny". I thought this would make a perfect Valentine. I stamped the image in Archival jet black and colored it with colored pencils and OMS. The sentiment was computer generated using my favorite font, Curlz. Both the image and the sentiment are mounted with foam squares for dimension. I made 3 of these.My second design is this one:
 How cute is this frog? It is from All Night Media. I stamped the background hearts on a window card. I then used my Nesties to make the little red frame around the cut out. I colored the frog with colored pencils and OMS then cut him out and attached him so that it looked as if he was hanging out of the window. I used a heart punch to make the heart above his head which is attached on the inside of the card. When you open it up it simply says "Happy Valentine's Day" and the heart is above it. I thought this would make a better "boys" Valentine. I made 3 of these.Here is my third design:
 I love these little bugs. This image is from Stampendous. I colored them again with colored pencils and OMS. I used Angel Wings Shimmerz on their wings for the glittery effect. I used my Nesties to cut out the scalloped rectangles and mounted the image and the sentiment with foam squares. Again, the sentiment is computer generated. I made 6 of these.
My fourth design: Another House Mouse stamp. This one is so adorable. Again, I used my colored pencils and OMS to color the image. I mounted it on a Nesties scalloped rectangle and then mounted that to the card with foam squares. Added a strip of the same color card stock and added the ribbon I got at Michael's. I thought this too was a perfect image for a Valentine's Day card. I made 2 of these.My fifth design:
 This almost has a 50's retro look doesn't it? The tree image is by Artful Inkables from their "Endless Limbs" set. I stamped it with Versamark ink, then embossed it with fine detail black ep. I then stuck on all of those puffy heart 3 dimensional stickers. Attached that to a double matte of pink and black card stock and added the black photo corners. I made 3 of these.My sixth design:
 This is somewhat whimsical. I have this mini envelope punch that I never use, and I thought how can I use a mini envelope on a card. I then came up with this idea. I wanted it to look like the hearts and butterflies came flying out when it was opened. I used the mini envelope punch and a heart punch for those things. I then stamped the flourishes after I had attached my envelope to the card. I stamped the butterflies with Colorbox red ink and then cut them out and attached them. I attached the Nesties scalloped circle with the sentiment with a foam square for depth. I then used my sparkly Gelly Roll pen to do a few highlights. I really do like how this one turned out. I made 2 of these.My seventh and final design:
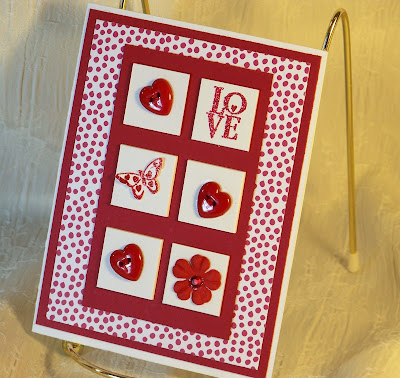 I used "Inchies" on this card. This is the first time I've ever used them. For those of you who don't know what they are, they are 1 inch X 1 inch squares made out of almost something like chip board. They are pre-cut. So, I stamped the "love" image on one and embossed it with red tinsel ep, attached one of those stamped and cut out butterflies to another, glued button hearts on 3 more of them and finally attached a small flower and glued a small red gem in the center of that. I then attached them to the red card stock and that to the printed paper and then that to more red card stock which was then attached to the card. This one screams Valentine's Day! LOL I made 5 of these.Here are all 24 cards together:
 I cut the heavy watercolor card stock to A2 size cards, and they all have coordinating colored envelopes.So, there you have it! It was a lot of work, and at times my hands were cramping from all of the cutting, piecing, and coloring. However, every time I would start to whine, I would think of what those kids must go through on a daily basis, and I shut my mouth very quickly! LOL This was a labor of love and I hope my cards bring these kids some love and smiles. They so deserve that.OK, now to the blog candy for this project. I'm asking that you make some Valentine's Day cards for these kids and help Pat out. If you do, I will enter you into a drawing for the blog candy below:
 It includes:A complete stamp set that has every season covered. It has 24 stamps in the set.A Fiskars cylinder punch set with a set of images for making baby stuff (elephant, bear, duck, rabbit.)A vertical wood mounted "Thank You" stamp.2 spools of dog and cat ribbon.2 heart punches.1 dog paw punch.3 mini leaf punches.2 mini magnet frames.1 Hershey's Cookies and Cream giant candy bar in a sleeve that I made.Here's what you do: Simply leave a comment on this post (you don't have to send cards to Pat to enter, but it would be so nice if you do). If you would like to help with this project, please send Pat an email letting here know that you want to help. You can get the details here: Pat Adam. You can send her an email at mrsmiley6@aol.com. I will then put your name into a drawing and I will pull a winner on February 8Th. Deadline for getting cards to Pat is February 7Th. So, please help if you can. Hope that made sense. . .Anyway, thanks so much for stopping by. You are the best, and I so appreciate your comments. They truly mean so much to me. Especially coming from such a talented group as all of you. Take good care! I'll be seeing you on your blogs! Don't forget the pic of the week below.Best,Curt O'Brien"God help me be the person my dogs think I am."
Hey All! HAPPY NEW YEAR!!! I hope your holidays were wonderful! Before I forget, my new year was started off right! I won a set of Copic Ciao markers! Retail is $139.00!!! I won them over at Gina K. "A day in the Life". I couldn't believe it. Many of you sent me emails telling me I had won. When I left my comment to enter the blog give away, there were already 690 comments. I thought I didn't even have a chance, and boom I won! I'm so excited. Gosh I have missed you and blogging. So many of you have sent me emails wondering where the heck I've been. Well. . . . I'M BACK!!! LOL I was just simply taking a breather. I was so burned out from all of the Christmas stuff that I just took a break. There was also another reason which brings me to the "theme" of this post. My room was a DISASTER AREA! And quite honestly, I didn't have the energy to go up there and clean it up. I knew that it was going to be more than just "cleaning". It needed to be totally re-organized and re-done. It was getting to the point that I didn't know were anything was, and it was a chore to even create in that mess. So, in hopes of inspiring you if you are in the same boat, I'm going to embarrass myself by posting pictures of the way the room was. I'm also going to share with you some organizing ideas I've done to help you organize your wooden stamps, clear stamps and punches.If you are faint of heart, please go past these horrifying images right on to the "after" shots. I did a makeover on my room. So, the next series of pictures will be the "before" of the area followed by the "after". I tell ya, it looks like an HGTV makeover! LOL OK, you ready? Here is the first "Before" picture:
 YIKES! I told you it was bad! And now for the "After":
 That's my little stamping buddy Gunther lying by the desk. That's generally where he always lays while I'm doing my thing. . .
BEFORE:
 AFTER:
 BEFORE:
 AFTER:
 BEFORE:
 AFTER:
 It took me hours to finish this project. I read this along time ago on someones blog that a comedian once said "Glitter is like the craft worlds version of Herpes. Once you have it you can never get rid of it." LOL I had glitter everywhere! The carpeting still glitters in places after two vacuumings! Oh well. . .
On to a couple of things I did to help me organize my clear stamps and my wood stamps and punches. This may be old news to some of you but I came up with it out of necessity. I didn't know half of what I had when it came to my punches and my wooden stamps. They were tossed in several different drawers. So the first thing I did was to organize my clear stamps. Here's what I did: When you buy clear stamps, they usually come on clear acetate that has the image on it as well so that you know where to put the stamp back when you are done using it. I took those from each set, and taped them to a piece of card stock, put it into a clear sheet protector, and put it into a 3 ring binder. I then took the actual stamps and put them in a clear CD case. I numbered each page with a number (see red arrow above) and then taped the same number to the CD case. Now when I'm looking for an image, I simply browse through my "catalog" find the image I want, and then pull the corresponding CD from the stand on my desk (pic below).
 As you can see, I have 44 complete sets of clear stamps now in this very small space and I know exactly where they are!
 This is what the stamps look like in the CD case. You take that "inner round thingy" out before using it for the stamps.Now, how I solved the problem with my wooden stamps. Although I can't find a convenient way to store them (like in a CD case) I can organize the images so that I know what I have. I decided to do another "catalog" in the same binder. I took out all of my wood mounted stamps, and stamped the images on sheets of card stock. I tried to keep them in the same family, theme, or holiday. I then put them in sheet protectors and put them in the same binder. Now, I can flip through the pages and see all of the images and make a better choice from ALL stamps instead of just grabbing what is "on top". Below is a sample of how it looks in the binder:
 This is not only a great way to see all the images you've got, but you can see how they actually look when stamped. I've now sorted the wooden stamps into 3 drawers and kept them by theme so that if I want the pine branches I know they are all together in one drawer as opposed to possibly being scattered between five drawers.And finally, I did the same thing with my punches. I took dark paper and punched the shape into it, then put that onto white card stock so the shape would show clearly. I then put that into a sheet protector and put that into the same binder. Now I have a "catalog" of all of my punches. I also punched them by theme so they are easier to see what I have for each group. Here are a couple of pages to show you what they look like:
 There you have it. My organizational tips. I hope they help.Finally, I wanted to say thanks to all of you who sent me wonderful Christmas cards! They were all so beautiful! I wanted to also say a special thanks to a couple of people that sent me some "extra". Cheryl Bambach of "Cheryls Stamping Corner" sent me some great stuff. She had a link on her web page about taking a Christmas Carol quiz. So I went and took it and came back to leave a comment about what my score was. I didn't realize that it was for blog candy. It was very nice of her to send me the great prizes she did. Thanks so much Cheryl! Also, my blogging buddy Marie Pavitt at Marie-Aloha and Mabuhay sent me a beautiful card and a jar of Shimmerz. I can't wait to try it! Thanks so much Marie! It was so appreciated!OK, that's enough. I'm sure you saying "geez, can he make this any longer?" LOL And the answer to that would be yes. But I'll save it for next time. I'm working on new cards and a new worthwhile project that I'll share with you next post. It involves some blog candy just so ya know!Again, I've missed you all so much! I hope you haven't forgotten me! I'll be seeing you on your posts! It's really good to be back! Don't forget the pic of the week below!Best,Curt O'Brien"God help me be the person my dogs think I am."