Curt's Best Shots Slideshow

Wednesday, December 30, 2009

THE WEDNESDAY EVENING POST DECEMBER 30TH 2009

Evening Everyone!  I hope your holidays were everything you hoped and more!  Jay and I spent a quiet one with my Mom and his Mom here for dinner on Christmas evening.  I wanted to thank all of you who sent me beautiful Christmas cards!  I was thrilled with each of them and I will keep and cherish them always.

On to tonight's post.  I'm not posting any projects tonight, because I wanted to dedicate tonight's post to a movement that is going on in the blogging world of card makers.  It is the subject of how everyone has their comments settings set for their blogs.

As we visit our favorite people's blogs, we are asked to jump through hoops (sometimes many) just to leave a comment on a blog.  First you have the word verification, then some have it set when you leave a comment and hit submit it takes you to another window where you have to do word verification and then click another button just to leave your comment.  Then there are others that you have to scroll down past all comments before you get to leave your comment.  This is very time consuming, and I personally feel that if our visitors are kind enough to want to leave us a comment, we shouldn't make them work so hard to do it.

On some blogs that are joining this movement, some folks are stating that they will no longer leave comments on those blogs that make them jump through these hoops.  I don't subscribe to being that over the top.  I'll leave a comment on everyone's blog no matter what.  But I would like to ask that you at least think about changing your settings so that you can make it easier for people to leave you comments.  Here is what I have done (have for a while now) and these settings make it the easiest for people to leave comments while giving you complete control:

1.  Click on "customize" at the top of your blog (in Blogger).

2.  Click on the "settings" tab.

3.  In settings,  click on the "comment" tab.

4.  Look for "Show Word Verification" make sure "no" is checked.

5.  Look for "Comment Form Placement" and click "pop-up window".

6.  Look for "Comment Moderation" and click "always".  Then make sure you enter your email address in the box provided so that you are notified when there are new comments waiting to be approved.

7.  Click save settings.

It is so simple to do.  I changed mine a few months ago, and I've had absolutely no problems.  The annoying posts that idiots try to leave can easily be rejected when you moderate your comments.   The advantage to the pop-up window is that it allows the commenter to see your post or scroll to a place in your post without having to come back to the comment window.  This makes it easy for them to comment while looking at what they are commenting on.

I do agree with one of the bloggers that I visited last week when she said "Why would we want to make it harder on our visitors to leave us a comment?"  That is why I have made several changes to my comment settings over the last few months.  Not once have I had an issue by taking the word verification off of my blog.  That was taken off 5 months ago.

So, I urge you all to think about this and to go in and change your settings.  It will save so much time for your commenters.  How about making it a New Year's Resolution!?!  LOL

Well, that is it for this subject.  I hope you all can jump on this bandwagon with me and make it easier for all of us to comment on each other's blogs.

I will close this blog post with a very sincere wish, in an original poem I wrote for all of you:

May your sorrows be few and far between,
may your laughter be loud and strong,
May your blessings be the biggest you've ever seen,
may your life be happy and long.

May you be surrounded by the ones that you love,
may your worries be little and few.
May the angels protect you from the heavens above,
may your skies be sunny and blue.

May your enemies be few and your friendships be many,
may your riches be plentiful too.
May this coming New Year be better than any,
for these are my wishes for you.

Written by:  Curt O'Brien

The Happiest of New Year to all of you!

Best,

Curt O'Brien

"God, please help me be the person that my dogs think I am."

Thursday, December 24, 2009

CHRISTMAS EVE POST 12/24/2009

Merry Christmas Eve Everyone!  I hope this post finds you all in good spirit and surrounded by all those that you love.  I waited to post my "Wednesday Evening Post" until today because I wanted to post the last of my Christmas cards of the holiday and wanted to send you all holiday wishes.

So not a lot of gabbing on this post.  Here are my cards:


Made with Artful Inkables tree stamp and Martha Stewart Cardinal punch.


Stamp is from the dollar stamp bin at Michael's.  Sentiment is computer generated.


This is a Mo's digital image from Digital Pencil Too.  Reminds me of Gunther.  I can't color things that are supposed to be black!  Does anyone have a tip for me?


This is my first easel card.  Jay has a friend that loves cats, so he asked me to make her a Christmas card with a cat on it.  This is the only cat image I have (Mo's digital).  This easel has a surprise on it. . .take a look:


I hid the sentiment under the image.


That pile of peppermint candy gave me a fit!  LOL 


This is originally a birthday stamp, but a change of colors and presto! a Christmas card.


Love those mouse cookies!


I love the look on the one startled bear's face.  LOL


This is the Christmas card that I made for my Mom.  I hope she likes it.

Well those are the cards.  I'll be making a bunch more over the coming months for my inventory to sell next fall at the big craft fair.  I have a feeling that I'm going to be really sick of Christmas cards by next Christmas!

I want to thank you all for being such wonderful blogging friends.  I've received cards from several of you and they are just so special!  I'll be highlighting them on my next post.  Thank you so much for them, I treasure each of them!

I want to wish you all a VERY MERRY CHRISTMAS and the best that the new year has to offer.  On the Christmas Eve night, I'm going to have some hot cocoa and sit here to visit each of your blogs to leave you each an individual message.  So I'll see you later!

MERRY CHRISTMAS TO ALL AND TO ALL A GOOD NIGHT!


Best,


Curt O'Brien


"God, please help me be the person that my dogs think I am."

Monday, December 21, 2009

HOUSE MOUSE MONDAY CHALLENGE #59

Hey All!  Happy Monday everybody!  Can you believe it is the week of Christmas???  I hope you all are ready to enjoy this fun week.

Today is House Mouse Monday Challenge, and today's challenge #59 comes to us from Lori and it is "Winter Wishes".  It can be anything relating to winter, Christmas, snow, winter birthday, etc.  This is such an appropriate challenge because today is also the first day of winter!

Here is my card:


This is one of my favorite Gruffies stamp.  It's called "Beary Big Delivery".  This was a tough one for me to color.  Those packages made my eyes cross coloring in every little detail.  But it was worth it because it turned out so colorful.  Doesn't the car remind you of an old Volkswagon?  I colored it with colored pencils and oms.  I outlined all the chrome parts on the car with a silver pen.  I then stuck on silver nail heads for the hubcaps.  I used liquid diamonds on the headlight, taillight, and front windshield for a glassy look.  The snow is done with liquid appliqué and covered in glitter.  I then cut the whole image out and attached it to the polka dot background paper with foam squares.  I added the sentiment (Martha Stewart) circle and snowflakes as the embellishments.  Here is a close up:


Look at that sweet baby in the back seat!  This stamp just has so many details and was a blast to use.

Well, that's it for this post.  I do hope that you go over and play if you have time.  At least go over and take a look at the other wonderful cards made by my team members.  They are all so talented.  You can visit the blog HERE.  

I'll be posting again on Wednesday with a boat load of stuff to share.  So I hope to see you then.  Have a wonderful week and stay warm!

Best,

Curt O'Brien

"God, please help me be the person that my dogs think I am."

Wednesday, December 16, 2009

WEDNESDAY EVENING POST - DECEMBER 16, 2009

Hey All!  Happy  Hump Day to all of you!  Hope this Wednesday evening finds you safe, warm, and well!

I have some fun, FUN stuff to share with you that I found during my blog adventures this week.  I found the cutest card I think I have ever seen, and I had to do one of my own.  It turned out so well that I ended up mass producing them to send out to several people.  I can't wait to share it with you so let's get to it!

When I see a card that is done with mostly punched or die cut images on them, I usually am not that excited over it.  I think to myself, "that's cute, but where's the stamping??? Anybody can die cut or punch out shapes. . ."  Gosh, just typing that makes me feel like such a snob!  But when I saw this card I just went nuts over it.  Here is my version:


Punched polar bears!!  Are they not adorable?!?  I sure think so.  The card is 5 X 7.  This card incorporates several techniques that I don't use often.  Punching shaped animals, ripping paper and then sponging it, and distressing.  These bears are made from my Nesties circles and ovals die sets.  The snowflake background paper is by The Paper Studio and the card stock is by Bazzill.  I paper tore the two "snow banks" and then sponged the torn edges with a light blue ink by Colorbox.    All edges of the pieces of the bears were distressed with the edge of my scissors to give a fuzzy look and to help distinguish each piece of the bear from the other (because everything is white).  The sentiment is from a Martha Stewart clear stamp set.  I also outlined each ripped edge of the "snow bank" with glitter.  The eyes and the nose are punched out with a standard paper hole punch and I used white ink to add highlights.  I also added a black Rain Dot to each of the noses to give it a shiny look.  Here is a close up shot:


EDITED TO ADD:  I inadvertently gave the wrong link when linking to the person who actually came up with the polar bear idea!  I'm so sorry Laura. . I went to the blog I listed to get the link to your blog and ended up using the wrong link!  What a Dork I am!  The link has now been corrected.  You can go here to see the person who came up with this great idea HERE.  You can also go see a video tutorial HERE.

My next card to share with you is a HM card.  I made it for a general Winter card.  Take a look:


I LOVE this image.  It reminds me of sledding when I was a kid.  I colored this with my ccp/oms and used liquid appliqué which I then glittered.  The sky was actually colored this time with my colored pencils and oms.  This is a large image.  The card is 5 X 7 so you can see it is pretty big.  There wasn't much room for embellishments or a sentiment.  Here is a close up of the snow and glitter:


My third and final card to share with you tonight is another Christmas card that I am making several of because it turned out really cute and easy to make.  Take a look:


Isn't this a cute image.  I've not seen this around on SCS or other places.  I picked it up at Archiver's yesterday and used it right away.  The stamp is by Northwood Stamps.  It was fast and easy to color, and I used my liquid appliqué to add the "fluffy" to the clothing items.  I matted it with black cut with my long scalloped rectangle Nesties.  I made the belt out of a black strip of card stock and gold card stock for the buckle.  The sentiment is actually a cheap foam stamp which I stamped with Versamark and then embossed with gold.  This is an A2 size card.

Last on my agenda for this evening's post is to show you the light box that I put together.  I think the photos for this post look much better because of it.   Here is what it looks like as I'm photographing the above card:


LOL  So professional huh???  I took a box and lined the inside with white paper on the bottom and the sides.  As you can see on the back, I just use a 12 X 12 piece of printed paper and can swap it out based on the subject of my card so that I have coordinated backgrounds!  The light fixture on the top is is a clip on lamp that has a silver reflective collar around it.  The other two are just can lights.  I prop them up on stuff to get the best light angle for the photo.  The white paper inside the box seems to do a great job in bouncing the light back onto the card.  It might not look pretty, but it has made a great difference with the light quality of the photos for my blog without natural light.  So I thought I would share this with you all to show you that I no longer have to stand on my head for the shot!  LOL

That's it kiddos!  I've had a great time visiting your blogs these past few days.  You guys have done some amazing work!  You are all such inspirations to me.  I hope in some small way I am giving some of that inspiration back to you in my posts.  I sure hope so.

My next post will be Monday's HM challenge.  I can't wait till you see it.  It is so hard not to be able to show it until Monday, but I have to follow the rules!  LOL  So I'll see you then.  Thanks for stopping by and for the wonderful comments you all leave.  You guys are wonderful!  Don't forget the pick of the week below!

Best,

Curt O'Brien

"God, please help me be the person that my dogs think I am."

Thursday, December 10, 2009

THE WEDNESDAY EVENING POST DECEMBER 9TH 2009 (on Thursday! LOL)

Hey All!  Finally got my SD card to make up with my computer again!  Electronics really drive me nuts sometimes.  As some would say, "short drive. . . ."  LOL  OK, on with the post!

I tried two different things this week.  One was something I saw on SCS and thought that it was simply genius.  It was one of those things that when you see it, two things happen.  1.  You think to yourself "why didn't I think of that?" and 2.  You run to your craft room to give it a try.  Here is my card using this cool technique:


I love how this pine tree turned out!  I got the idea from this person's card here.  This tree was made obviously from punched out branches.  My punch is from McGill.  I punched out a ton of these little branches in two colors of green to give it more depth and a more real color look.   Here is a close up:


Yes, it was time consuming to glue each of those branches to each other, but I think the end result was worth it.  I stuck glittery dots on it for ornaments, then mounted it with foam squares to the matting which I ran through the CB with the Swiss Dots folder.  I stamped on the card stock strip running behind it a pine branch and pine cone motif (stamps by Hero Arts) and then mounted the main image onto that with foam squares.  The background was created using my CB again with the snowflakes folder.  The sentiment is a K & Company piece.  This card has a lot of great dimension and texture.

The next thing I wanted to try is a new product from Impression Obsession called "Shake It".  These are pre-formed plastic molds so you can easily make a shaker card.  Here is my card:


I like this product a lot, however I was not happy that the plastic form did not match any of my Nestabilities round dies nor any of my circular punches.  Luckily, I had a circle cutting set that I bought a long time ago from Making Memories and it was the closest fit.  Here are some close ups so you can see the product better:


They do make great shakers and are much easier than having to make your own.  You just stamp your image, put your shaker material on the center of your image, peel off the adhesive strip that is on the back and plop it on.  It forms a super seal.  For my shaker material I used sugar!  Sugar has a natural sparkle, and doesn't tend to stick to the plastic with static cling like glitter does.  Plus it is heavy enough to really make a great shaker sound.  The image is from The Craft Lounge, colored with colored pencils, and the paper is by Paper Pizazz.  I made the base of the snow globe by hand and embellished it with punched out snow flakes that I colored with a Gelly Roll glitter pen.  I then added pearls to each.  I chose not to use a sentiment because the background paper said what I wanted the card to say!  The bow was made with my Bow Easy.

Now, I need to announce the lucky winner of my "duplicate stamp" that was up for grabs in the last post.  Drum roll please . . . . . . . . . . . . . . . . and the winner selected randomly by Random.Org is. . . . . . .Lorraine A!  Yea Lorraine!!!!  Can you send me your address so I can get it out to you?  Congrats to you.  I'm sorry everyone couldn't win!  I swear, when I win that lottery, you guys are gonna be so blessed!

So, there you have it.  I'm planning to use the snow globe cards in one of those boxed card sets I'm making to sell next year.  They make great winter note cards.

Again, thanks so much for visiting.  I hope I made it worth your time.  I so appreciate you coming by and leaving the comments that you do.  My plan tonight is to grab a glass of wine and sit in front of my computer and visit each of you to see what you have been up to!


Don't forget the Pic of the Week blow!!!!

Hope you are all well and safe.  Until later!

Best,

Curt O'Brien

"God, please help me be the person that my dogs think I am."

Wednesday, December 9, 2009

POST DELAYED

Hey All!  Sorry to report that I'm having issues with getting the pics of my cards off of my SD card.  I'm working on the issues, but there is no way I'm going to get a post up tonight. . . sorry. . .Today was Jay's Mom's 80th birthday so we just got back from dinner, and it is horribly cold and icy outside.  We had winds that topped 60 mph tonight.  So trying to walk both my Mom and his 80 year old Mom across icy parking lots and sidewalks has wore me out!  LOL  I'm just too tired to be messing with this silly SD card and I'm getting more frustrated by the minute.  So, I'll tackle it again in the morning and hope to have the "Wednesday Evening Post" up on Thursday afternoon!


Hope you are all well!


Best,


Curt O'Brien

Monday, December 7, 2009

HOUSE MOUSE MONDAY CHALLENGE #58

Hey All!  Happy Monday!  As most of you know, every other Monday the House Mouse Monday Challenge blog hosts a new challenge.  And, as most of you know I am on the design team for them.  So, every other Monday I post my challenge piece on my blog.

This week's challenge (#58) is to make a Christmas card using non-traditional colors.  When I first saw what the challenge was, I kinda panicked!  LOL  You know, me and the word "non-traditional" don't mix very well. . .  So, I thought about different color combos first and came up with several, but was not excited about any of them.  Then the thought occurred to me . . . look at your stamps you big Dork!  So I did and found the perfect stamp which lends itself to the "non-traditional" colors.  Here is today's card:


How's brown and orange for "non-traditional"?  This stamp (Happy Hoppers) was one of a few of the first House Mouse stamps I ever purchased.  I'm also very proud to say that this is the very first image I colored entirely with my Koh-I-Noor pencils that Chris gave me!  I really do love them, although I will never abandon my ccps, these were great to use and I really like the results.  Thanks again Chris!

The background paper is by The Paper Studio and the card base and matting is Bazzill.  I used a punch to  make the corner brackets and added sparkly dots for a berry look.  I slanted the main image panel for some interest and used orange dew drops in the right hand corner.  The sentiment circle is from K & Company.  I was really surprised that even though I used these colors, it still looks like a Christmas card.  I guess that's what challenges are for huh?  LOL

So please take a moment and go take a peek at the other designer's work for this challenge.  I'm in some wonderful company with them!  And if you get a chance, I would love to see you play along.  I'd really be interested to see what all you wonderfully creative, talented people can do with this challenge.

I hope you all have a good week!  Don't forget that I'll be publishing the winner of the House Mouse stamp up for grabs from last Wednesday's post on the next Wednesday Evening Post (12/9).  So come back and see me on Wednesday!

Thanks for stopping by and taking a look.  As you all know, your comments and support mean so much to me!   Take good care of yourselves!

Best,

Curt O'Brien

"God, please help me be the person that my dogs think I am."

Wednesday, December 2, 2009

WEDNESDAY EVENING POST - DECEMBER 2, 2009

Hey All!  Happy Hump Day and welcome to another Wednesday Evening Post.  This one is going to be one of my shorter ones.  I have a couple of things to show you, and I'll get to that in a moment.  But I have some business to take care of first.

I have had some idiot posting anonymously and posting garbage ads in the comment section.  People like that are just plain evil in my opinion.  Why do they have to go around screwing with people?  It will never make sense to me.  So because of this idiot, I have had to turn on the comment moderation feature. Now when you leave me a comment, it will tell you that it will be visible after owner's approval.  So, just wanted to let you know why it changed, and your comments will be posted, it will just take a little longer to see them.

Next, I need to announce the winner of the candy cane House Mouse stamp from last post.  Drum roll please. . . . . . . . . and the winner is . . . . . . .Diane at Nellies Nest!   Yea for Diane!!!  Can you email me with verification of your address so that I can get the stamp in the mail to you?  Congrats!  THERE IS ANOTHER SURPRISE AT THE END OF THIS POST SO BE SURE TO READ ABOUT IT!

 OK, now for my stuff to share.  I made another one of those bags again.  When making the first one, I had this thought in my head of using one to hold all the ingredients for a cup of hot chocolate.  I thought it would be a nice little thank you gift for the nice lady across the street who made me a set of beautiful hand quilted coasters.  So I wanted to say thanks with something other than just a card.  So here it is:


Is that bear cute or what???  Look how long his hair is!  LOL  This is a Gruffies stamp which is part of the House Mouse line.  I knew I wanted this image for this bag because of the contents.  You can see that I have some Nestles' hot chocolate packs (chocolate/Caramel Yum!), a small bag of marshmallows, and some candy canes.  I did two of everything because I didn't want her husband to feel left out!  LOL  I did the bag itself in a nice chocolate colored card stock and then distressed it with some walnut distress ink.  I colored this with my new Koh-I-Noor pencils that I got from Chris!  I really do like them a lot!  You are now officially an ENABLER!!!!  LOL  After coloring the image, I distressed the background with some more distress ink.  I punched out the pine branches and added glittery berries to them.  I wanted it to kinda look like your were looking through the trees spying on the bear as he enjoyed his hot chocolate.  Take a look at the ribbon in the pic above.  It even looks like it has wood grain in it!


You can see in his cup that I used a white pen to give it a foamy look.  I just love how hairy he is!  LOL  This image would be great for a gift of tea too.

My next card drove me nuts trying to photograph it.  I simply gave up and took the best shot I had (literally took 20 shots and this was the best)  Here it is:


Looks like crap.  It really is so much better looking in real life.  The stamp is from Penny Black.  I love this stamp and had only used it once prior to this.  I stamped the image in Versamark and then embossed it with fine detail white.  Once that was done, I went over certain spots with a Versamark pen and embossed those with silver tinsel ep.  The scalloped part was done using a Versamark pad rubbed on all of the scalloped parts and then embossed with the silver tinsel ep.  So it is all sparkly (no mater what I did I couldn't get the sparkle grrrr).  The "snow bank" at the bottom of the tree is silver rickrack.  The snowflakes are a MS punch with silver "nail heads" in the center.  The paper is from The Paper Studio.  I just wanted to make a simple winter note card for generic use.  It really is a lot prettier IRL.

I can't stand these dark dreary days!  I'm going down to my local hardware store tomorrow and get me a flood light to help with the lighting when I photograph these cards.  You would not believe what I go through with my two can lights and flexible neck desk lamp just to get light on these cards!  And then the contortions I go through to get a good angle!

OK, now for the surprise!!!!!  Well, I DID IT AGAIN!!!  What a dork I am.  I ordered some more House Mouse stamps so that I would have a good variety of cards for my sets.  I even looked at my list before I placed the order to be sure I didn't duplicate like I did last time.  Well it happened again!  I ordered a duplicate of one I already ordered.  And they came from two different companies on the same day!!!  LOL  Well you know what that means. . .I'm giving the duplicate away!  All you have to do is leave a comment, and I'll announce the winner on my next Wednesday Evening post on December 9th.  Here is the stamp, and it is really a super cute one!


When I first saw this stamp, I thought they were all singing, but they are actually trying to catch snowflakes!  Aren't they cute?  So, it's up for grabs.  Good Luck!

Thanks so much for visiting!  I love that you think of me enough to take the time to stop by.  I'm very lucky to have you!  Stay well and take good care!


Best,

Curt O'Brien
"God, please help me to be the person that my dogs think I am."

Sunday, November 29, 2009

FIRST CHRISTMAS PROJECT

Hey Kiddos!  I really hope that your weekend was fun.  I hope too, that you were surrounded by family and friends during the Thanksgiving holiday.  I know that I have so many things to be thankful for and YOU ALL are on that list!

Today's post highlights my very first Christmas project.  How do you like the updated look of the blog and the new pics of the boys?  LOL  Aren't they adorable in those Santa hats?  They are so good at posing for me and they tolerate so much with their Daddy's constant search for great photos of them!  I so love them!

I have been working on this project for the last several days trying to perfect it.  I plan on selling these next year at a huge holiday sale they have in this area every year at the end of October.  This project has a lot going on, so it's going to take me from now until next October to complete enough to sell!  LOL  Here it is:


And here is what's inside:


This is not totally my design.  I got the idea complete with a great tutorial HERE:  This is such a great stationery box and is so versatile for so many occasions.  The great thing about it is that it makes such a nice gift.  This set includes the following:

  • 4 note cards with envelopes
  • 4 embossed holiday gift tags
  • 4 embossed holiday gift enclosure cards with envelopes
  • 4 postage stamps
  • 1 note pad
  • 1 pen

It is such a surprise when it falls open when you lift the lid.  Here are some shots of the individual items:


The note pad cover is one of the things I added to the original design.  I used the same card stock (which was already embossed with the pattern) to make the cover.  I simply cut a piece that was a 1/4" wider than the pad.  I then cut out the decorative end with my Nesties.  I attached a ribbon around it, then attached it to the box with red line tape.  So you just untie the ribbon and only the pad comes out.  I also made simple loops with the same card stock and attached them with red line tape to form the pen holder.    The other thing I added was a stamp holder on the side.  I've decided in working with this, that I'm going to move the stamp holder to the box section right above the pad to hide the "intersection" of the two holders.  I think this will be better because where it is now, it causes a slight bulge on the one side of the box when it is closed.  Here is the stamp holder up close:


You can see above that the stamps are in a little pouch that is kept close with thin craft magnets.

Here are the tags:


The reindeer is embossed with gold detail ep and then I added a glittery dot for the "Rudolph" look to give them a little whimsy.  I used a red eyelet at the top and then ran gold cord for tying.  The stamp is by Stampendous.  


These are the gift enclosure cards.  I again embossed the image in gold detail ep then added glittery dots for the ornaments.  The stamp is by Northwoods.  Each card has an envelope. 

Here are the individual note cards:


I used liquid appliqué on their hats and glitter on the snow.  Here is a close up:


Next note card:


And a close up:


I used glitter dots on the patterned paper to bring out the berries, and glitter on the edge of the snow on the branches.

The next card:


I used some fuzzy yarn for the side of the card as an embellishment.  Now, the final card:


The photo makes it look like the image panel is not centered, but it really is.  It is just the angle and the shadowing because of the center matted image being popped up with foam squares.

All of the cards were colored with my colored pencils and oms, and of course all of the images are from Stampabilities House Mouse series.  I have ordered several different images so that I will have a variety of images to use for these Christmas note card sets.  But I'm sure you can see, that this box project would be great for "every day" note cards, Halloween, Easter, Autumn, etc.  The box really isn't difficult to make, and I'm sure with a little more practice I will be able to knock these out a lot faster.  Here is a final picture of the whole set  with everything shown:


So, do you think they will sell at a craft bizarre?  I sure hope so!

I also wanted to share with you a very special gift I received from my blogging friend Chris at Mudmaven Designs.  She had emailed me for my address and said she had something to send me.  Well this is part of what was in the package:


I was so surprised and excited.  I couldn't believe how kind and thoughtful!  She also included in the package a beautiful card, and Jumbones for my boys!  Chris, thanks again so much for your kindness and generous gift.  It is so appreciated!

Well, that's it.  I hope you liked what I shared and I hope that you try one of these!  I would love to know if you make one because I would love to see yours!  So let me know if you do!  I'll be doing my Wednesday Evening Post this coming Wednesday and will be announcing the winner of the HM stamp from the previous post.  Good luck to all of you!

Again, thanks for stopping by and caring enough to take the time to comment.  They mean so much to me.  Don't forget the pic of the week below! 

I'll be seeing you on your blogs!

Best,

Curt

"God, please help me be the person that my dogs think I am."

Monday, November 23, 2009

FIRST POST AS A HOUSE MOUSE DESIGN TEAM MEMBER!

Hey All!  Hope you all had a great weekend! 

I'm so excited about today's post!  My very first "official" House Mouse Monday Challenge Post as a design team member.  It seems I've waited an eternity for this day, and it is finally here!

This two week challenge #57 is to use a House Mouse image on a double pocket bag that you have to make!  I've never made one of these until this challenge, but I can see unlimited possibilities for their use and for every occasion and holiday (you can find the tutorial HERE).  Since Christmas is right around the corner, I decided to make mine Christmas oriented.  Here it is:


I had never seen one of these and for those of you who haven't either, the finished project looks like a mini shopping bag with two pockets.  And super easy to make too.  Since my House Mouse image was mice with candy canes, I decided to use it to hold candy canes.  I've already got another one in mind for holding ingredients for a cup of hot chocolate.  These are also perfect for holding gift cards too.  As you can see from the above picture, I added some tissue paper to really give it the "shopping bag look".  Here is a view so you can see the side better:


Those are full size candy canes, so you can get a better idea of the size.  Here are some more close ups:


As you can see from above, I made a border across the top of the bag with punched out gold pine branches and glittery sticker berries.  I also added these glittery berries on the corners of the image panel and added a scalloped red background to it.  I also attached the image to the bag with dimensional foam squares.  The ribbon handles coordinate with the whole theme, sporting fun candy canes on them as well.

So, there you have it!  But I have a SURPRISE for all of you!  In celebration of my very first House Mouse Monday Challenge post, I'M GIVING AWAY THIS STAMP!!!!  I found that I mistakenly ordered this one twice not realizing I already had it in a previous shipment.  So I thought it would be fun to give it away to one of you.  So, here's the deal. . . .all you have to do is twirl around 3 times, say I love House Mouse stamps as you twirl. . . .just kidding LOL  I can just see a few of you starting to twirl!  LOL  Just leave me a comment like you always do and I'll select someone next Monday at Noon Eastern time.  The winner will be announced on the December 2 Wednesday Evening Post.

Hope you liked this project enough to try one.  They are so cute after they are done.  Please be sure that you go take a look at the other design team member's projects HERE.  Everyone on the team is so talented!

Thanks again for all of your support and incredible comments.  Honestly, I don't think anyone has better readers than I do.  I love you guys!

See you on Wednesday!

Best,

Curt

"God, please help me be the person that my dogs think I am."

Wednesday, November 18, 2009

WEDNESDAY EVENING POST - NOVEMBER 18TH 2009

Hey All!  How the heck are ya?  Boy, it feels like forever since I posted.  Everything kinda got screwed up, but now I'm back on track.  Hope everyone is well and having a great week!

First things first.  I want to announce the winner of my note card set in the last post.  Drum roll please. . . . . . . the winner as determined by Random.Org is . . . . . . . . .DPKENNEDY!  Yea for DP!  Can you get me your address so I can get the set right out to you?  Congrats!  Thanks everyone too for all of your wonderful comments on my last post!  They really do mean a lot to me.

OK, now on to the current post.  Over the last couple of months, I have had many emails asking me if I could do a tutorial on how I color my House Mouse images.  One email stated "I would love for you to PROVE that they are as easy to color as you say they are!"  LOL  OK, I love a good challenge, so I put together a tutorial below showing exactly how I colored an image for my card and then the finished card.  I don't know how good this tutorial is going to be, but it does show me using my "cheap colored pencils" that I always  talk about.  So, on with the tutorial:

Here is a picture of my famous cheap colored pencils!  LOL  This group is a mixture of 4 different brands (Cran, Crayola, Sargent, and Rose Art) that I use the most:


First, I stamped the image onto 110# card stock using Archival Jet Black ink.  The image is a Gruffies (House Mouse line) stamp called "Beary Fast Sled".


The first thing I do is start outlining the image of the bear in the color he is going to be like this:


Once I have the image outlined, I lightly color the image with the same color like this:


Here is what it looks like before I start with the odorless mineral spirits.  I think you would agree that a third grader could do a better job!:


Now comes the OMS and blending stump.  I dip the stump into the oms to saturate it.  Then, moving in small circular motions from the edge of the image to the center, I start blending the color evenly like this:


You can see how the color is now filling in nicely.  Here is what it looks like after the first pass with oms:


Looks much better huh?  Now, I go back over the image with the same color darkening the areas where I think there should be shadowing like this:


I then blend again making sure there aren't any "hard" lines and that all looks smooth.  Here it is now that it is done:


Looks a lot different from the outlining stage doesn't it?  I left the stump in the picture because you can see on the tip that it has color on it.  I use what is left on the stump to color the face of the bear so that it is a lighter color of the same brown in the body so it looks like this:


So at this point, I have only used ONE pencil to color the bear.  Next I move on to the sled and hat.  Again, I do the outlining of the image with the color:


You'll see in the pic below an emery board.  I use an emery board to file off the last color before proceeding to the next blend:


Again, I do the blending of the color.  However, you might have noticed that I did not lightly color the center of the image like I did with the bear.  The reason is that with smaller areas, you will have plenty of color to pull into the center from the outline:


Here is what the sled and hat looks like now:


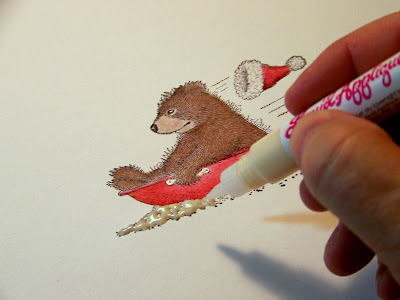
Next, I wanted the handles to have a metallic look so I used a silver glitter pen to color it in:


We are now at using only 2 colored pencils and one pen.  I wanted the snow to be 3-D so I used my liquid appliqué for this effect:


Once I have it applied I use my heat gun to make it puff up.  Now I know to PROPERLY use liquid appliqué, you put it on and let it dry overnight, then you use your heat tool.  However, I wanted the puffy look because I thought it would look appropriate with a sled pushing mounds of wet snow and clumping it to the side as it passes.  So I heated it up:


Here's where we are now:


I wanted the "snow" to have a glitter to it, so I used Diamond Glaze along the edges and then added glitter:


I then realized that I hadn't made his cheek rosy like I usually do to these sweet images, so I use a light pink pencil to color right over the top of the brown, then blend it lightly with the oms:


So now I have used a total of 3 colored pencils and a pen to complete the coloring.  Here is the finished colored image:


Now to the card I made using this image.  Here it is:


If you click on the picture, you'll see that I stamped the hat a second time, colored it, cut it out, and attached it with a foam square for another 3-D effect.  Looks like his hat is flying right off the card! I'm disappointed with the picture of the snowflakes.  They were punched out of a super glittery piece of card stock so they are really shimmery in real life.  The "snow" is really sparkly too.

So, there you have it.  You see, there really is nothing to it!  These images are so easy to color and you don't need much of anything to do it.  I used 3 colored pencils for this image and got all the shading I needed.  I hope now you see that it is really pretty easy to do.  If I left anything out or you have questions, please send me an email and I'll be glad to tell you whatever you need to know.  I hope this was helpful!

Now, I'd like to share a RAK card I got from my very sweet blogging buddy Sharon over at Grandma's House of Cards.  She is so talented as you are about to see.  Take a look at this card:


I LOVE THIS SO MUCH!  The quality of the materials, her coloring, the image itself, everything!   For a real treat, go take a look at her work.  She is simply amazing!  Thanks so much Sharon!   It came at a perfect time!

OK, that's it!  Thanks so much for visiting!  You know how much I love you guys!  There are days I don't know what I would do without you.

My first House Mouse Monday Challenge post will be THIS MONDAY!  I'm so excited and nervous.  Can't wait to show it to you.  So, until then, you all take good care!  Don't forget the "Pic of the Week" below!

Best,

Curt

"God, please help me be the person that my dogs think I am."