Curt's Best Shots Slideshow

Showing posts with label Gruffies. Show all posts

Wednesday, March 19, 2014

THE WEDNESDAY EVENING POST FOR MARCH 19, 2014

Hey All!

Welcome to another edition of the Wednesday Evening Post.  I'm happy to remind you that today is the LAST DAY OF WINTER!!!!!!  I've actually seen signs of Spring, so I know it's coming and it has been a very long wait.

I hope this post finds you well and happy.  Tonight's post (BTW, I've used a larger font-what do you think?) contains more thank you cards.  Seems like I have been thanking people left and right lately.  That makes me a lucky guy to have so many out there doing stuff that deserves thanks. 

As most of you know by now, I have a brand new set of choppers.  The dental staff has been wonderful, and I wanted them to know how much I appreciated them.  Here are the cards I made for them:

FOR MY DENTIST
FOR THE HYGIENIST
FOR THE FRONT OFFICE 
The first two are of course House Mouse images and the last one is Gruffies.  That is one of the many reasons I love these stamps, because they have an image for just about anything you would want.  On the second one, I created the "crocodile skin by running it through the CB with an embossing folder, then covering it with Versamark and embossing it with clear embossing powder (twice).  It gives it a leather look.  On the last card, I created the background paper using clip art.

I also needed a "manly" thank you card for someone else who helped me recently.  Here is another "guy" thank you card:


I actually got the inspiration from a card from one of my old House Mouse buddies Patricia Rose HERE.  I liked her two-toned oval.  So I changed it up a bit by running it through a wood grained look embossing folder, then using distress ink to make it look a little more like wood.  I added the copper square brads and then a banner greeting all on some DSP for background.  You are going to see a lot more square cards from me.  I've never really liked the A2 size card.  The square just gives more room to do stuff and is more impressive in size.

Pic of the Week:


I think these Canada Geese are tired of this crappy winter too.  I love how they were standing on just one leg while trying to keep the other one warm.

Well another post is complete.  The next post will be written (wait for it. . .wait for it. . .) IN THE SPRING!!!!  LOL  I've still got just a few more people to visit then I will be all caught up.  So hang in there those of you who haven't seen me yet. . .I'm coming!

Hope you all are doing great. . .

Hugs,

Curt

PS. . .there were a couple of you who asked for the instructions for the gift card holder I made last week.  Your blog is not set up so that I could reply with it so here is a link in case you were interested:  GIFT CARD HOLDER


Monday, August 16, 2010

HOUSE MOUSE MONDAY CHALLENGE #76

Hey All!


It's another House Mouse Monday Challenge.  This two week challenge is based on the following picture:


Here is my take:


I've never done this before. . .mixed House Mouse images with a Gruffies image, but I'm so glad I thought to do it.  I LOVE how this turned out, and I have to say this is one of my most favorite House Mouse cards I've made to date.  It was a lot of work with all the cutting out of the images, but I think it was worth it.  The images are colored with my colored pencils and oms and then individually cut out and placed in the scene.  The floor was created by cutting a strip of paper that had a wood grain to it.  I then cut a strip of dark brown card stock for the molding.  I used the pink polka dot paper for the "wall paper".  The bear is attached flat to the card, but all the mice have been popped up with foam tape to give more dimension.  I have so many new ideas floating in my head now that I have combined these images.

Hope you get a chance to play with us over at House Mouse & Friends Monday Challenge in the next two weeks!  You could win a House Mouse stamp of your choice from our very generous sponsor Simon Says


Thanks again for stopping by!


Best,


Curt O'Brien


"God, please help me be the person that my dogs think I am."

Monday, June 21, 2010

HOUSE MOUSE MONDAY CHALLENGE #72

Hey All!  Happy Monday to everyone!  Hope everyone is doing well and had a great weekend.  Thanks for all the wonderful birthday wishes I received this weekend!  More on this on my Wednesday post!

Today starts a brand new House Mouse and Friends Monday Challenge.  This week, Christine has challenged us with the theme of "New".  New house, new baby, new job. . .you get it.  So here was my take on it:


This is a Gruffies stamp called "Hammock Hibernation".  The great thing about the House Mouse stamps is that they include the Gruffies and the Happy Hoppers which gives you so many wonderful images to use for every theme under the sun.  I chose to make this a retirement card, but wouldn't this make a great Father's Day card or guy birthday card?  I colored it with colored pencils and oms.  The sky was sponged AFTER THE FACT with light blue ink.  That is another great advantage of coloring with colored pencils!  The wax in the pencil resists ink.  I just color the image and then sponge the ink, not worrying about getting the ink on colored areas.  I then use a paper towel to wipe over it.  The sentiment is computer generated.  The paper is from the Paper Studio.  The sun embellishment is made of poly resin  and was bought a couple of years ago from a store that has gone out of business.  Here is a close up because it is so cute:


I really hope that you will play along with us this week.  I'd love to see what you guys come up with.


Thanks again for stopping by!  I hope you come back on Wednesday to see if you are the lucky winner of my blog candy!  I'll be posting the winner on my Wednesday Evening Post.  I already know who the winner is. . . .LOL!


Hugs to all of you and wishes for a great week!


Best,


Curt O'Brien


"God, please help me be the person that my dogs think I am."

Wednesday, June 2, 2010

WEDNESDAY EVENING POST - JUNE 2, 2010

Hey All!  How are ya???  I want to apologize first and foremost for being a horrible blogging friend.  I have neglected so many of you.  I have not meant to, but my time taking care of Jay has been so much more in demand, it has been hard to keep up with all the blogs I regularly visit.  HOWEVER, things have been getting better slowly but surely, and I am now pretty much back on schedule.  So I WILL BE SEEING YOU IN THE NEXT FEW DAYS!  Thank you for being so supportive and understanding.  You have been wonderful!

As I stated above, I'm finally getting back on track hence my Wednesday Evening Post is on time!  LOL  I HAVE A WONDERFUL TECHNIQUE TO SHARE WITH YOU TODAY!!!!  Take a look at this:

The sky and grassy hill is done with a technique called MELTED CRAYON.  This was such a blast for several reasons.  First, doesn't it have a Van Gogh feel to it???  Can you believe that sky and hill were done with ordinary crayons and a travel iron????  Take a look at the close up below:


If you click on the pic above, you'll see the texture (which looks like paint) and the glossiness of the finished background.  The "trees" are actually a two-step leaf stamp from Memory Box.  The scale of the leaf made it a perfect tree stamp for my scene.  I stamped the "trees" with Staz-On ink because the finished surface is slick.  I also stamped the sentiment with Staz-On as well.  I just can't believe that you can get this effect with a travel iron!  Look at these great backgrounds I created for future use:


Doesn't this look like granite?  I used brown and pink for this one.  Here is another:


I think this looks like a piece of jade.  The other thing that was fun about this project was going out and buying a big box of Crayola 64 Crayons.  Boy did that bring back memories for me.  When I opened the box and smelled that unmistakable smell of crayons, I was immediately transported back to my childhood.  Wow, the memories that crayons brought back to me.  It was like opening a magical time machine.  Some of the images and memories that it invoked were so vivid and fresh and not thought of in many, many years.

If you are interested in learning this fun technique, check out the great tutorial complete with a video HERE.

The next card I want to share is a card I made for ME!   LOL  I'm always making note card sets for others, and when I saw this stamp, I knew that this would be used for the following note card for me:


I love this Gruffies stamp!  The way the card turned out is exactly what I had pictured in my head when I saw this stamp.  I colored it with my colored pencils and oms.  The paper is by The Paper Studio.  I got another stamp that is nothing but piano keys, and I plan to make a different one using that stamp to create a background paper.

The final card I want to share is on a sadder note.  One of my teammates on the HM design team has a sister who is terminally ill.  She asked if we would send her a card.  She said that she loves frogs.  I don't have many frog stamps, but I did have this one from Anna Wight's "Fish Friends" by Whippersnapper Designs, so I made this card for her:


This was marker colored and the sentiment was computer generated.  I used a CB folder for the background because this one reminded me of frog skin!  LOL  I hope it cheered her.  I also enclosed a small frog charm inside the card for her.

Well, that's it for this post.  Can't believe it is June already!!!!  HEADS UP!!!!  My birthday is this month and to celebrate, I'm going to have a blog candy give-away!!!!  I think I've got some great stuff to offer up, so keep checking back!

Hope you enjoyed the post.  I'll be seeing you on your blogs over the next few days.  BTW, you still have time to enter for the House Mouse and Friends Monday Challenge Blog Hop blog candy give away.  So click HERE for the details!

Take care all!  I love you guys!  Don't forget the "Pic of the Week"!


Best,


Curt O'Brien


"God, please help me be the person that my dogs think I am."

Wednesday, November 18, 2009

WEDNESDAY EVENING POST - NOVEMBER 18TH 2009

Hey All!  How the heck are ya?  Boy, it feels like forever since I posted.  Everything kinda got screwed up, but now I'm back on track.  Hope everyone is well and having a great week!

First things first.  I want to announce the winner of my note card set in the last post.  Drum roll please. . . . . . . the winner as determined by Random.Org is . . . . . . . . .DPKENNEDY!  Yea for DP!  Can you get me your address so I can get the set right out to you?  Congrats!  Thanks everyone too for all of your wonderful comments on my last post!  They really do mean a lot to me.

OK, now on to the current post.  Over the last couple of months, I have had many emails asking me if I could do a tutorial on how I color my House Mouse images.  One email stated "I would love for you to PROVE that they are as easy to color as you say they are!"  LOL  OK, I love a good challenge, so I put together a tutorial below showing exactly how I colored an image for my card and then the finished card.  I don't know how good this tutorial is going to be, but it does show me using my "cheap colored pencils" that I always  talk about.  So, on with the tutorial:

Here is a picture of my famous cheap colored pencils!  LOL  This group is a mixture of 4 different brands (Cran, Crayola, Sargent, and Rose Art) that I use the most:


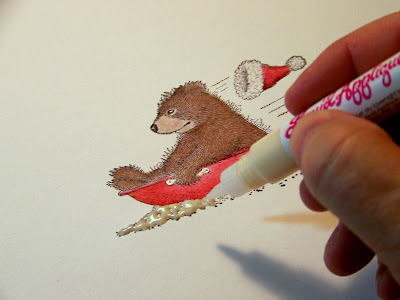
First, I stamped the image onto 110# card stock using Archival Jet Black ink.  The image is a Gruffies (House Mouse line) stamp called "Beary Fast Sled".


The first thing I do is start outlining the image of the bear in the color he is going to be like this:


Once I have the image outlined, I lightly color the image with the same color like this:


Here is what it looks like before I start with the odorless mineral spirits.  I think you would agree that a third grader could do a better job!:


Now comes the OMS and blending stump.  I dip the stump into the oms to saturate it.  Then, moving in small circular motions from the edge of the image to the center, I start blending the color evenly like this:


You can see how the color is now filling in nicely.  Here is what it looks like after the first pass with oms:


Looks much better huh?  Now, I go back over the image with the same color darkening the areas where I think there should be shadowing like this:


I then blend again making sure there aren't any "hard" lines and that all looks smooth.  Here it is now that it is done:


Looks a lot different from the outlining stage doesn't it?  I left the stump in the picture because you can see on the tip that it has color on it.  I use what is left on the stump to color the face of the bear so that it is a lighter color of the same brown in the body so it looks like this:


So at this point, I have only used ONE pencil to color the bear.  Next I move on to the sled and hat.  Again, I do the outlining of the image with the color:


You'll see in the pic below an emery board.  I use an emery board to file off the last color before proceeding to the next blend:


Again, I do the blending of the color.  However, you might have noticed that I did not lightly color the center of the image like I did with the bear.  The reason is that with smaller areas, you will have plenty of color to pull into the center from the outline:


Here is what the sled and hat looks like now:


Next, I wanted the handles to have a metallic look so I used a silver glitter pen to color it in:


We are now at using only 2 colored pencils and one pen.  I wanted the snow to be 3-D so I used my liquid appliqué for this effect:


Once I have it applied I use my heat gun to make it puff up.  Now I know to PROPERLY use liquid appliqué, you put it on and let it dry overnight, then you use your heat tool.  However, I wanted the puffy look because I thought it would look appropriate with a sled pushing mounds of wet snow and clumping it to the side as it passes.  So I heated it up:


Here's where we are now:


I wanted the "snow" to have a glitter to it, so I used Diamond Glaze along the edges and then added glitter:


I then realized that I hadn't made his cheek rosy like I usually do to these sweet images, so I use a light pink pencil to color right over the top of the brown, then blend it lightly with the oms:


So now I have used a total of 3 colored pencils and a pen to complete the coloring.  Here is the finished colored image:


Now to the card I made using this image.  Here it is:


If you click on the picture, you'll see that I stamped the hat a second time, colored it, cut it out, and attached it with a foam square for another 3-D effect.  Looks like his hat is flying right off the card! I'm disappointed with the picture of the snowflakes.  They were punched out of a super glittery piece of card stock so they are really shimmery in real life.  The "snow" is really sparkly too.

So, there you have it.  You see, there really is nothing to it!  These images are so easy to color and you don't need much of anything to do it.  I used 3 colored pencils for this image and got all the shading I needed.  I hope now you see that it is really pretty easy to do.  If I left anything out or you have questions, please send me an email and I'll be glad to tell you whatever you need to know.  I hope this was helpful!

Now, I'd like to share a RAK card I got from my very sweet blogging buddy Sharon over at Grandma's House of Cards.  She is so talented as you are about to see.  Take a look at this card:


I LOVE THIS SO MUCH!  The quality of the materials, her coloring, the image itself, everything!   For a real treat, go take a look at her work.  She is simply amazing!  Thanks so much Sharon!   It came at a perfect time!

OK, that's it!  Thanks so much for visiting!  You know how much I love you guys!  There are days I don't know what I would do without you.

My first House Mouse Monday Challenge post will be THIS MONDAY!  I'm so excited and nervous.  Can't wait to show it to you.  So, until then, you all take good care!  Don't forget the "Pic of the Week" below!

Best,

Curt

"God, please help me be the person that my dogs think I am."

Saturday, July 18, 2009

NOTE CARD SET

Hey Kiddos! Happy Weekend to all of you. I hope you had a great week and you are planning to have a great weekend.

Today's post is short and to the point today. I have a note card set to share with you today. I made this for another neighbor who I talk too every so often when I'm out walking the boys. I have found that she had a very similar past life that reflects so much of what I am going through with Jay now. Her husband was very ill, in a motorized wheelchair, and eventually passed. I could not get over all the things that she went through that I'm going through now. It's nice to find someone who actually understands the frustrations of taking care of someone and to be able to just "talk" about it sometimes. She has been a great help to me in that respect, and I wanted to show her how much I appreciate it. She also has a wonderful sense of humor and drops some "hard" language sometimes which always makes me laugh. The funny part is that she is an English teacher by trade.

Did I say this was gong to be short??? LOL OK, on with the card set.


OK, I know this was not the best choice for ribbon. HOWEVER. . .I tried 8 different ribbons trying to match the "overall" color of this card stock. I found one that was almost "perfect", but it was majorly wrinkled. So, I tried to iron it, and it shriveled up and melted! So, this was the only one that didn't look totally horrible.

I made four cards for the set. Here is the first one:


This is a Gruffies stamp from Stampabilities. The paper is from The Paper Studio. I used my cheap colored pencils and OMS to color it, and cut the image out with my Nesties labels die.

Here's the next one:


This is a House Mouse image from Stampabilities. Again, pretty much of the same info on the supplies as the first one.

Next:

This is a Happy Hoppers image from Stampabilities. Colored pencils & OMS, blah blah blah. Accept on this one, I sponged the sky background with Colorbox ink (much darker IRL, sun washes it out), and I did something I've not done before on the balloons. First, I double stamped them, but before I added them on the card, I tried a technique that I've seen on several blogs that I never think of doing. I turned the cut out balloons over in the palm of my hand and used an embossing tool to "round them out" and poof out more. I LOVED how they turned out. So 3-D!! I then attached them with foam squares. I also coated them with Diamond Glaze for the shine factor. I again also added cotton batting for his little fuzzy tail!

Last card in the set:


Another Gruffies image. How sweet is that face!?! Again, colored pencils/OMS. I used a new product (new to me) that I got at JoAnn's called "Fabric Tac" to make the ribbon loops. This stuff is great! Tiny drop on one side, lightly touch the other side to stick, and tah dah. . .ribbon loop to add. (I know, little things like this seem to amuse me.) LOL

Here is the whole set all together:


So, that's it. She loved them and I was glad for that. However, she said she didn't think she could send them to anyone, because she wanted to keep them for herself. LOL

OK, that's it for this post. 9 more days until the DT announcement. I'll have one more post before it's announced.

Thanks again for taking the time to look at my stuff! I still can't believe that people come to see me! I'll be seeing you all on your blogs! Don't forget the pic of the week below!

Best,


Curt O'Brien

"God, help me to be the person my dogs think I am."