Hey All!
Sorry this is several hours late, but I've been working on a project that I wanted to post to this post. I finally finished it this morning, and I'm so excited to show it to you. I am saving it as the last project I'll show you on this post!
I've got 3 more things to show you this post. The card I want to start with is my first card for High Hope Stamps as a guest designer. The challenge over at High Hopes is to use ribbons or bows on your card. Here is mine:
Is she not the cutest???? Her name is "Oops Ellie". I am so in love with the High Hopes stamp lines. I can't wait to do more for them on their challenges, but on the new releases and blog hop. Stay tuned for more info on those upcoming events. In the meantime, why not jump over there and have a look at the challenge this week? You can find the blog HERE.
My next card is for a friend who recently got a new house. Here is the card I'm sending her:
Honestly, this has to be one of my favorite stamp sets. It is the Beams and Boards from Papertrey Ink. Sponged the sky, colored the images with colored pencils and oms, cut everything out, grass was made with paper from The Paper Studio, created the scene, and then used Flower Soft there for the flower beds in front of the house. Here is a close up:
Flower Soft is the coolest product, and I wish I used it more.
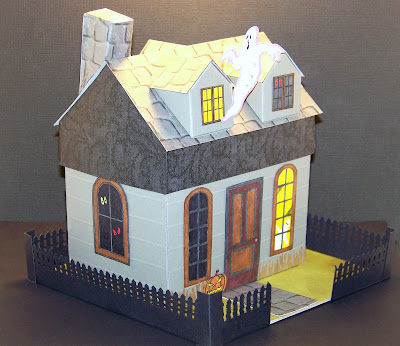
OK, now for the Grand Ending of the post. This has to be one of my MOST FAVORITE PROJECTS ever! LOL Are you ready???? I've taken several shots of it here is the front shot:
OMGosh I had so much fun making this! This was made from a template from PTI. It comes as a plain house template that you print out, put together, and decorate however you want. You know me and Halloween, so when I bought it online ($5 what a steal!) I knew the first type of house I was going to create was a spooky house for Halloween. I LOVE how this turned out! Here are some other shots:
This little project took me about a total of 6 hours to put together. But you know me and details. . .I went online to find printable windows, doors, roof patterns, etc. I saved them to Word and then sized them to the size I needed. I printed them out colored them and attached them to the house. You can see from some of the photos that I scored the main part of the house to look like siding. I placed the whole thing on some sturdy chip board then decorated it with paper and the MS punched out fence. Now, here's a great little surprise. . . . . . . .
It's a treat box!!!!
How cool is that? This is a great size too! It measures approximately 4.5 inches across the front, 3.5 inches across the side, and from the bottom to the top of the roof is 5 inches. It is really roomy inside too. You could get loads of stuff in it. I'm going to use this one as a decoration on my entry table for Halloween.
Boy do I have tons of ideas for this too. I'll be showing you all of the ideas I have for this template in the upcoming posts.
OK, that's it for now. Hope you enjoyed the post as much as I enjoy your comments. You are all such a boost for me. I still need to catch up on some of your blogs, and will be visiting as usual everyone else's in the next couple of days.
Hope all of you are well! Thank you so much for stopping by! Don't forget the "Pic of the Week" below!
Hugs to all of you!
Best,
Curt O'Brien
"God, please help me be the person that my dogs think I am."


