Hey All!
Can you actually believe that it is a week before Thanksgiving???? Didn't Halloween just end last week??? Where does time go? I feel frazzled but like always, you all look incredible and calm. Amazing!
OK, on with the post. I ADDED A NEW VIDEO TO THE SIDE BAR! Many of you said you enjoyed the walk with Shotsy & Gunther that I did last Winter and asked if I'd do another one. So, I now have recorded an Autumn walk. So, if you are so inclined, go take a hike. . .err I mean a walk with us! LOL
Now for my cards and project. Take a look:
These are small boxes that I created to sit at each setting at the dinner table for Thanksgiving. I wanted them to be functional, so each contain chocolate dinner mints (Andes) for after the feast as well as a decorated toothpick! How's that for functional? The two boxes on the side were done with DSP (don't know, didn't look) and the middle one is done with plain cardstock and decorated. I stamped the turkey and colored it with Bic markers then attached it with a dimensional. The leaves on the other two were cut with Nesties and the CB, added Stickles, a button, and some twine. Filled each box with natural shred then added the mints and decorated toothpick. Each mint was painstakingly wrapped with matching DSP.
Here's a card:
Another one of my beloved House Mouse images. This one is new to my collection. I splurged and bought it at Hobby Lobby. I got it for 40% off! Colored with my colored pencils and oms. The sky was sponged with distress ink. I did a lot of fussy cutting of the leaves on this one so it would look like he is throwing them out of the picture and onto the card. I also cut out the 3 above him and popped them up with dimensionals for a 3-D effect. I really do love how this one came out.
Last card:
My first Winter card!!! Yikes! The snowman and sentiment are by Crafty Clear stamps. Colored with a combo of Bic markers and colored pencils/oms. There is lots of glitter on this one, but you can't see it unless you click and make it bigger. The white background is also embossed with the Swiss Dots ef, but you can't see that very well either. Oh well. . .you are probably tired of looking by now anyway! LOL
Pic of the Week
I just loved this shot when I got it uploaded. I believe that this is an Ornamental Pear tree sprout coming up wild in the field. Even the "sprout" was dressed for Fall in the midst of the browns and beiges.
Video of the Week
This video makes me laugh every time I watch it. And who says dogs don't have feelings!?!
OK, that's it for another post. I hope you are all well and happy. Again, I'm so pleased you joined me for another Wednesday Evening Post and I hope you have enjoyed yourself. It's always good to have you here and you are always welcome!
Love you guys!
Curt
"God, please help me be the person that my dogs think I am."
Curt's Best Shots Slideshow
Showing posts with label autumn. Show all posts
Thursday, November 17, 2011
Wednesday, October 13, 2010
WEDNESDAY EVENING POST - OCTOBER 13, 2010
Hey All!
Here is my first card to share:
Ok, the next two cards (photoed together) were cards I made for my Mom's birthday from her "GRAND DOGS"! LOL Here they are:
OK, now for my last card which leads to the tutorial of what I came up with. Here is the card:
Here is a quick tutorial:
Here are the supplies you need:
Versamark ink (or any pigment ink - just needs to be sticky - I used a Versamark pen)
Embossing powder (any color)
A pop top
A heat gun
Pair of tweezers
I started by coating the top of the pop top with Versamark ink (you could smoosh it on a pad too):
Then using a pair of tweezers, I drop it right into the jar of embossing powder:
Take it out and gently lay it on your scrap paper. Using your heat gun, start to melt the embossing powder:
It doesn't take but a few seconds because the aluminum really conducts the heat. Just leave it on long enough to where you see the embossing powder is not only melted, but it is nice and smooth.
And here is the finished result:
Here is the "Pic of the Week":
I took this a couple of days ago at a park where I meet my Mom and her little dog Chunk to walk the boys. We are finally getting some beautiful color.
Hope all is well in your worlds! Again, thanks for coming and I'll see you on your blogs soon!
Best,
Curt O'Brien
"God, please help me be the person that my dogs think I am."
I swear these Wednesdays come fast and furious don't they??? Well, since it is Wednesday, it's time for another Wednesday Evening Post. Believe it or not, there are NO Halloween cards in this one! However, I do have a short tutorial to show you. I believe it has not been done before, but if it has, it was something I came up with on my own anyway. I've not seen it anywhere and I go to lots of places. LOL OK, so on with the post!
Here is my first card to share:
These stamps are by Hero Arts and they came in the same package. I really love them. We had a new neighbor move into the rental property right across the street from us so I made this card for her. I colored the houses with my colored pencils and oms, cut them out and placed them on the green leafy printed paper and sponged blue paper I pieced together. I then stamped the trees and fences (from PTI), cut each out and added to the scene. I popped the tree tops up with foam tape for some added dimension.
I knew immediately that she was going to be a great neighbor when I saw her two dogs romping in the yard! Yeah! Another dog person! So along with the spice cake cupcakes I baked and took over, the pups needed something too. So I made this up really quick:
Just a simple brown paper lunch bag I stamped with various dog stuff, punched a couple of holes in the top for the dog paw ribbon, and filled it with dog cookies and "Pup Corn". She seemed to be pleased, and she seems very nice. She is also a physical therapist and even offered to help my with Jay if I ever needed it. So nice of her.
Don't they look like Shotsy & Gunther?!? LOL The one on the left is of course Shotsy and I created him by piecing parts of dogs from an Inkadinkado stamp set. I added the studded collar as well. Gunther on the right is a stamp set that was made by Jami at "Stamp Happy". Most of you I'm sure remember when Gunther was selected to be put into rubber many months ago. I paper pieced his bandanna from the same background paper. I popped up both images with dimensionals for depth. Mom loved them!
OK, now for my last card which leads to the tutorial of what I came up with. Here is the card:
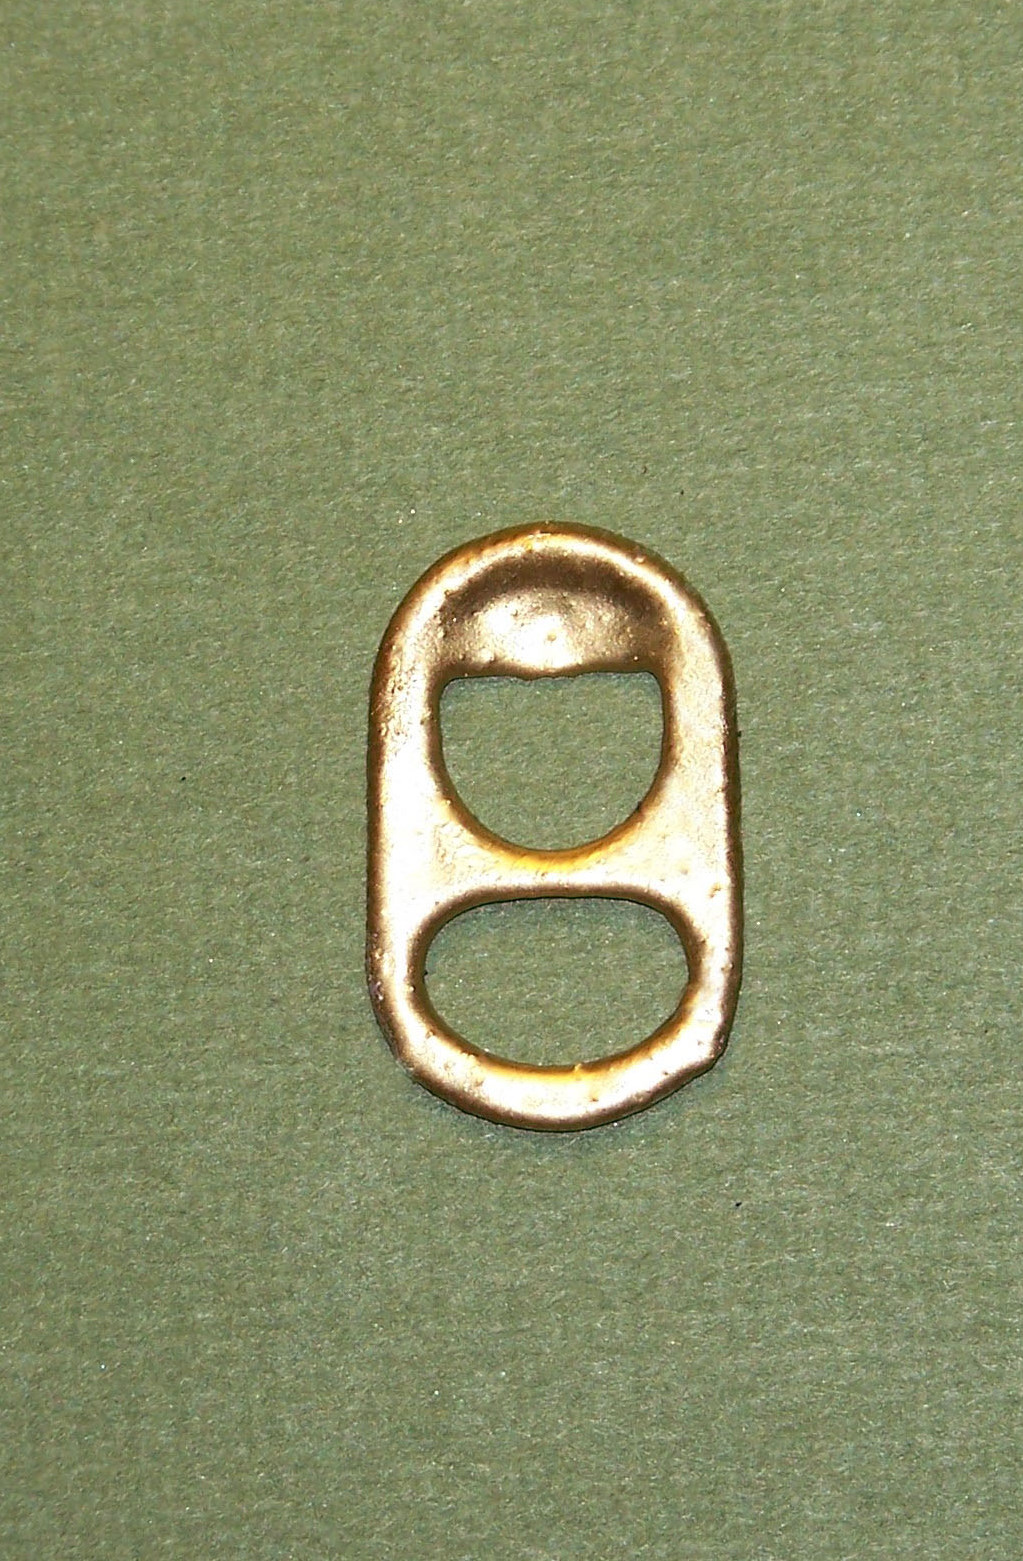
I've decided to start making cards like "thinking of you", "get well", etc. in Fall colors for when I need them this season. You see the little "buckle" on the card? Well, that again is a coke pull tab, but with my own twist on it. I started to color it with a marker and wasn't happy with it, so I thought "Why not try embossing it?" And that is what I did and it turned out really neat. Here is a close-up:
Here is a quick tutorial:
Here are the supplies you need:
Versamark ink (or any pigment ink - just needs to be sticky - I used a Versamark pen)
Embossing powder (any color)
A pop top
A heat gun
Pair of tweezers
I started by coating the top of the pop top with Versamark ink (you could smoosh it on a pad too):
Then using a pair of tweezers, I drop it right into the jar of embossing powder:
Take it out and gently lay it on your scrap paper. Using your heat gun, start to melt the embossing powder:
It doesn't take but a few seconds because the aluminum really conducts the heat. Just leave it on long enough to where you see the embossing powder is not only melted, but it is nice and smooth.
And here is the finished result:
The one on the card above is copper, this one is gold, I've made one in shiny black and also in red. The color choices are only limited to the number of colors of embossing powder. They also color up well with markers too, but not as nice as the embossing powder.
So, there you have another Wednesday Evening Post. Again, thanks for stopping by and taking a look see. Hope I gave you some ideas along the way. I'm behind on my blogging but I'll be catching up in the next few days, so if I've not visited you yet, I'm on my way!
I took this a couple of days ago at a park where I meet my Mom and her little dog Chunk to walk the boys. We are finally getting some beautiful color.
Hope all is well in your worlds! Again, thanks for coming and I'll see you on your blogs soon!
Best,
Curt O'Brien
"God, please help me be the person that my dogs think I am."
Labels:
autumn,
dogs,
new neighbor,
tutorial for buckle
Wednesday, September 29, 2010
WEDNESDAY EVENING POST FOR SEPTEMBER 29, 2010
Hey All!
Happy Hump Day! I wanted to say thanks to all of you who left me such wonderful comments regarding my father's death and my brother's birthday. You all are so wonderful and I honestly don't know what I'd do with out you!
I also wanted to let you know that I've resigned from my House Mouse Design Team position. I am just trying to lessen some of the complication in my life. I also just want to concentrate on my own creativity and crafting for me. You'll still see HM cards on my blog because I love them so much. I'm just jot on the DT any longer. It was a fun stint and I am honored that I was a part of such a wonderful group of women.
OK, it's time for another Wednesday Evening Post, and as has become almost traditional, I have 3 cards to share with you tonight. So, here they are. . .
My first is a birthday card for a great neighbor. She turned 70 last week, and I'm taking her to lunch on Friday to celebrate. Here is the card I made for her:
I love this Penny Black stamp and I've had it for quite a while. This is its debut card. Since it was her 70th birthday, I thought this card was so appropriately funny. Look at that one chicken getting ready to blow out the candles and the one's look of worry on his face with the fire extinguisher LOL. This is a technique combo where I "painted" the ground, table, cake and extinguisher with Distress Inks. The beaks and red thingies are colored with colored pencils/oms. I used a Sizzix EF for the background because it looks like chicken wire to me. OMG!!!! I just looked at the picture and noticed I didn't color one of the beaks!!!! LOL I can't believe that! Good thing I haven't given it to her yet!!!!
My next card is an Thanksgiving card. . .
Another one that I "painted" with my Aqua Brush and Ranger Distress Inks. It seems that I'm slowly but surely moving away from my beloved colored pencils and moving more towards those wonderful distress inks. I chose this sentiment (by Stampendous) on purpose because it is usually used for Christmas cards. However, I think it is a great sentiment for Thanksgiving too. The image is by Penny Black and the papers are by Recollections.
My last card to share tonight is a Halloween card. . .You know I rarely do Halloween cards (eyes looking up at the ceiling looking very innocent) LOL This one is pretty generic but I like how it turned out. . .
I don't even like candy corn!!! And I don't like it even more after stamping and coloring all of these! I did several to fill the jar by masking several of them. This is my first attempt at faux stitching. How did I do??? I can't determine if I did it well or not. The jar stamp is by Inkadinkadoo and the single candy corn stamp is by Recollections. I punched the two corners with a MS punch and added bling. Candy corn was colored with colored pencils/oms. The lid was colored with a silver gel pen. I tied a little bow using some orange jewelry cord. Sentiment is by Studio G.
OK, that is it! Another Wednesday Evening Post is at a close. Don't forget to look at the "Pic of the Week"!
Thanks again for stopping by. I'm so pleased that you do!
Hugs to all of you!
Best,
Curt O'Brien
"God, please help me be the person that my dogs think I am."
Labels:
autumn,
birthday,
candy corn,
halloween,
penny black,
thanksgiving
Thursday, September 16, 2010
THE WEDNESDAY EVENING POST FOR SEPTEMBER 15, 2010
Hey All!
My next card is my first Fall card of the season. . .
My last card that I want to share with you is again one with some RECYCLED material. It is also the first of the Thanksgiving cards I've made this year. . .
Can you tell what is the recycled piece on this one???? Here's a clue, it is part of the pumpkin. . . take a look at the picture below for another clue. . .
LOL, do you think I've lost my mind???? The picture below is the backside of the above. . .
OK, all done. I hope you've enjoyed your visit! Please don't forget the "Pic of the Week". I think it is really a unique one. Not the greatest shot I've taken but still unique.
I'll be visiting you all in the next few days to see what you've been up to! Can't wait to see. I hope you are all well and having a great week.
Hugs to all of you!
Best,
Curt O'Brien
"God, please help me be the person that my dogs think I am."
It is Wednesday again, and time for another Wednesday Evening Post. I've got a TON to share with you, including 2 projects with RECYCLING. You won't believe what I used! I've also got what I think is a really cool "Pic of the Week" at the bottom of the post, and a photo to share.
I also want you to meet a brand new blogger! Lee and I "met" when she sent me an email wanting to know if we could be "pen pals". Lee lives in St. Agnes, Cornwall and was such a sweet lady I immediately agreed. She sent me several emails and we corresponded back and forth for several weeks. Then I got to see a card she did and it was wonderful. I started bugging her to start her own blog, but she kept telling me she wasn't computer literate blah, blah, blah. So, long story short, she agreed to start a blog because I offered to help her set it up. She is now up and running and I know she would love for you to visit. Here is the link to her blog: LEES CRAFTY CORNER. She has already got quite the following and has only been up a few days. Happy blogging Lee!
OK, on to my cards. . .
The first one is a sympathy card I did for a very sweet neighbor. Her father passed away recently, and I wanted her to know how sorry I was. Here is the card:
If you click on the picture, you will see that I added Flower Soft to the silhouetted images. I stamped the image several times and left the space for the sentiment. I did my own mix of Flower Soft for this card. I had a jar of Nut Brown and a jar of Bright Orange. So I mixed up a little of each to come up with what you see. The stamp is a Penny Black. Now, here is the RECYCLED part of the card. . .can you see it? It's the little buckle on the ribbon. . .can you tell what it is???? It is the pop top from a can of Coke! I got this great idea from one of Gina K's videos over at Stamp TV. I think it is one of the best sites on the Web. You can color them with markers and I made mine look like tortoise shell with a copper and gold marker. The last thing I did was color the white of the ribbon with a tan marker to soften the white.
My next card is my first Fall card of the season. . .
This card started out as a different technique using bleach. "How did that work out for you Curt" you ask???? Not so much! Gina K made it look flawless, but mine just looked like I spilled bleach. Oh well. . .So I started all over and went to a new technique. Painting with Ranger Distress Inks and an Aqua Brush. I am so in love with the Ranger Distress Inks. I honestly believe they are the best and most versatile inks on the market. I stamped this Hero Arts image with Versamark ink, then embossed it with fine detail black ep. I used Rusty Hinge, Crushed Olive, and Fired Brick inks to color them. I stamped the Ranger ink on a clear acrylic block then picked up the color with my Aqua Brush. The colors are so vibrant. Your going to see lots more projects where I'm using the Ranger inks. The sentiment was computer generated.
My last card that I want to share with you is again one with some RECYCLED material. It is also the first of the Thanksgiving cards I've made this year. . .
Can you tell what is the recycled piece on this one???? Here's a clue, it is part of the pumpkin. . . take a look at the picture below for another clue. . .
LOL, do you think I've lost my mind???? The picture below is the backside of the above. . .
Is this fun or what??? A blogging friend of mine in Texas had made a great card using a pumpkin made out of this. I went nuts over it, and she surprised me be sending me some of it! So, I made my card using the pumpkin I made out of it. Makes you kinda want to start pulling other packaging apart doesn't it??? LOL My pumpkin was created by cutting out 3 ovals with my Nesties and then I distressed the edges with distress inks and then glued them together. The "stem" is ribbon obviously, and the sentiment is from Waltzing Mouse Designs "Peaceful & Plenty" stamp set. I forgot to look who did the paper. Sorry. It's a simple card but I think it is really sweet and has a country/folksy kind of look.
That's it for the cards, but I am hoping your will indulge me for just a moment. I took the boys to a local park today for their daily jaunt. When we take a rest, Gunther has this thing he does where he plops down and starts rolling back and forth (no, he is not rolling in anything smelly - LOL). As he rolls on his back, back and forth, he makes this guttural, growling noise as if he is frustrated about something. He has done this for years. However today, he really was into it and when he finished this is what he looked like:
OMG it made me laugh right out loud. He had all those sticks and leaves stuck all over him, and his bandanna had come up and hung sideways on the top of his head. I was laughing so hard that I could barely hold the camera still to get the photo, and I was so thrilled at how it turned out. He is such a HUGE CLOWN! Thanks for indulging me on this picture, but I just had to show it to you all.
OK, all done. I hope you've enjoyed your visit! Please don't forget the "Pic of the Week". I think it is really a unique one. Not the greatest shot I've taken but still unique.
I'll be visiting you all in the next few days to see what you've been up to! Can't wait to see. I hope you are all well and having a great week.
Hugs to all of you!
Best,
Curt O'Brien
"God, please help me be the person that my dogs think I am."
Labels:
autumn,
fall,
gunther,
recycled parts,
sympathy,
thanksgiving,
wednesday evening post
Friday, August 21, 2009
HUGE, GINORMOUS, POST!!!
Hey All! How the heck are ya? Happy Friday to each of you! I have tons to share with you today! I mean TONS! LOL I don't know what's gotten into me, but I have been one card making crazy person. There are a couple of things that I just can't wait to tell you about, so let's get started!
I have found the coolest challenge site! I normally don't play in challenges, but this blog is a blast, and the owner is such a generous person! It is called "Midnight Madness" and you can see the link over there to the right. They give away really wonderful prizes, cash, and other fun stuff! They have a HUGE give away going on right now that is totally awesome! Click on the picture of all the stamps over there to the right that is labeled "Midnight Madness Blog Candy". There, you'll find all the exciting details. Here is the sketch for this week followed by my card:

I'm really getting into the Fall mood and can't wait for the Autumn season to start. I used my CB to do the leaves in various metallic papers. The card stock is Bazzill and the printed paper is by ProvoCraft pad called "earth tones". Here is a close up of the leaves:
I played in their last sketch challenge for the first time last week. Here is the sketch they had followed by my card:

Is that not a great image??? It is a digital image by McMahon Five Designs. I fell in love with it the moment I saw it and had to have it. I colored it with colored pencils and OMS and sponged the background of the image with distress ink. The background paper is from DCWV Fall Stack . The punched border is a MS punch. I added copper ribbon and dew drops to finish it.
Next, (yes, yet another card to share) I want to share with you a new card technique I found on SCS. Well, it's new to me and I LOVE doing these cards! It's called a "recessed window" card and you can find a wonderful video tutorial here. Here is my card:
I hope you can see the dimension of the card in this pic. I just can't get over how cool this recessed window card turns out. I followed the measurements in the video, but I came up with my own way (easier in my opinion) to do it. I simply cut 2 squares as templates for the recessed window. The first one is a 3 inch square and the inside one is 2 3/4 square. I then simply place the card on a cutting mat, place the first square onto the front of the card and trace around it with an embossing tool. I remove that square then center the second smaller square in the center and trace around it with my embossing tool. Works like a charm (you'll understand better after you watch the video. I made the pumpkin by using my Nesties ovals and cut out 3 and put them together after using ink around the edges for depth. I used punches for the leaf and vine, and free handed the "stump". The leaf is again created from my CB and I added copper glitter to the veins of the leaf. The background in the shadowbox part is done with the Core'dinations paper and a CB folder. I stamped the leaves on the outside of the frame with Versamark ink then embossed them with clear ep. I forget who the sentiment stamp is by.
These recessed window box cards have a million ideas going on in my head. I have a Halloween seen in my head right now that I will be making for the next post. Just got a bunch of new Halloween stamps that will be perfect for this. Can't wait!
Finally (whew), I want to show you is my newest note card set. I can't tell you how frustrating it was trying to photograph these! It's because of one of the materials I used on the cards and the holder. Here is the holder:
As you can see, the background mat and the corners, and the Nestie cut out are all done in "mirrored" paper. This stuff is super shiny and you can actually see yourself in it. I first saw paper like this on Sharon Johnson's blog months ago. What gave me the idea for these cards was that gold, mirrored bee up there. It was on a set of note cards that I bought at Michael's at the beginning of Summer. I'm always buying stuff like this thinking that I can alter it on a later project. Here is the holder open:
You can now see the cards inside. Here is one of the cards by itself:
I cut the embossed bee from the ready made note card set with my Nesties. I then matted it with the mirrored paper that I got at Hobby Lobby. It was actually in the matting section in framing. It was a huge piece (I believe it was 3.5 feet X 2.5 feet). I just cut it down to pieces I could work with. The background paper is embossed with a new Quik Cutz embossing folder called diamonds and dots (I believe). It reminded me of a honey comb, sort of. . .LOL. I then used a honey colored ribbon to give it a finished look. The ribbon is actually darker IRL and does go with the paper. Here is a pic of the complete set:
You can see in this shot how shiny they are because of all the reflected sun shimmering off of them. Working with the mirrored paper is a pain though, because it really picks up your fingerprints, and I was forever wiping them from the shiny surface. But oh so worth it! I wish you could see these in real life. They have such a great "feel" to them.
Well, there you go! I've worn my little self out! LOL I hope you liked what I have shared today. I want to tell you too, that right after dinner tonight I'll be visiting all of you to see what you have been up to. I'm sorry I haven't been by sooner, but with the DT I'm on, the new challenge blog I'm playing with, and the jolt of creativity I'm experiencing, plus taking care of the house, Jay, and the boys, I've had precious little time for anything else. But I promise, I'm coming to see you tonight and tomorrow morning.
Again, thanks so much for stopping by. Sorry for the long post, but I just had so much to share with you, and that's what this blogging thing is all about, huh? LOL Can't wait to see what you have been up to and your latest creations! Don't forget the pic of the week below! Also don't forget that I'll be posting on Monday morning for "There's Magic in the Air". You are going to love next week's image! And again, it's FREE!"
Best,
Curt O'Brien
"God, please help me be the person that my dogs think I am."
Labels:
autumn,
fall,
midnight madness,
Note Card Set,
recessed window
Subscribe to:
Posts (Atom)