Hey all! This will be a short post because it is just a little announcement. I have been inundated with requests to do a tutorial on my diorama card from my last post (seen here). Many of the comments that were left for that post requested it and I had a ton of private emails asking if I would do one. I am so flattered that folks like yourselves who in my opinion are exceptionally talented want me to do a tutorial. I am honored! So, I will do one. It won't be a video, but a plain picture tutorial. I'm working on it now and it will be posted in the next day or two. I want to be sure I get it right and that it is as simple to follow as possible. So, be looking for it in the next couple of days. It's coming, and I thank you so much for asking me to do it!Lastly for this post, I have again gotten the sweetest of compliments from 4 of you out there in the form of another award. You all 4 gave me the same award and I thank each of you so much for it. Karen at 6 Wacky Women, Michelle Ueligitone of Mushi's Creative Inspirations, Toni at Whimsical Thoughts and Marie of Aloha and Mabuhay. These women are super talented and I know most of you have visited their blogs because when I leave comments on their blogs I see a lot of your names. If you haven't seen them jump on over and take a look - great stuff to be found there! Here is the award. . . It is hard to pick five to pass this on to. I always feel a little weird because I don't like to exclude anyone by picking others. On the other hand, I certainly don't want to offend those sweet people who sent it to me by not passing it on. The proverbial "rock and hard place" so to speak. Then you have to take into consideration that I've already seen this award on several people's blogs, so people I would pick already have it! So, I think the best thing to do is to accept it graciously with a statement that everyone I visit on a regular basis deserves this award so much more than me. And I humbly thank those who thought enough of me to give it to me. What I will do is nominate 3 more individuals for my award that I created a couple of months ago. I will post that in my next post after the tutorial post. I hope that is OK with everyone. I truly think you are all amazing.OK, that's if for this quick post. Check back in the next couple of days and the tutorial will be there!I'll see you all on your blogs.Best,Curt O'Brien"God help me be the person that my dogs think I am."
Hey All! Happy Monday! Hope you are well and having a good start to your week! I'm excited to bring to you what I believe is an original design by yours truly. I went out on Splitcoast and was cruising around, and saw diorama cards and thought they were pretty neat. However, they all were just that, "Dioramas". You opened the envelope and poof, there it is . . .no surprise. So I came up with a design that when you pull it out of the envelope the actual diorama is covered by a card front. As do the others I'm sure, mine folds flat to fit into a standard A2 envelope. When you pull mine out of the envelope, there is a "card", and then when you open the card, POOF, there is the diorama! I started this from scratch, and it took me forever to get all of the measurements right. But after many attempts and failures, I GOT IT RIGHT! So, here is the finished project. . . This is the front of the card right out of the envelope. I stamped this image (supplies will be listed at the end) on printed paper, and used a white Gelly Roll pen to color the snow on the trees. I used a decorative corner punch and inserted my stamped image. I attached it to the card and then attached pearls to the corners. Now, when you open the card, here is what you see. . .
 What do you think? I truly love how it turned out. As handy as I tend to be with my camera, I could not get really good shots of this card, but I think you get the idea here. I used the same image on the front of the card in the back of the scene. I then used a different tree stamp for the 3D part of the diorama. I stamped in with forest green Stazon ink, then used Marvy liquid applique for the "snow". I placed it on the image, heated it with my heat gun (to get it to puff up) and then immediately sprinkled glitter on it and lightly pressed it in before it was completely dry.
 Here is the close up so you can see the sparkles a little better.
 On the inside flap I attached the sentiment which I created on my computer using my favorite font called "Curlz". Remember the corner punch design on the outside? Well, I used the little "sprig" things that it cuts out as the corner adornments here.
  Here is a side shot of the card. The actual "front" of the card is underneath the sentiment side.Below is my first successful "prototype". I didn't pay close attention to detail on it because I was working the "bugs" out. But I show it to you to give you another idea of another scene, and another orientation of the front of the card. In this example, the front of the card opens from the side. . .
 Here is the front of the card.
 This is what it looks like when you open it. . .
 And here is a close up of the "scene". As you can tell, I was not very careful with the cutting out of the "front line" trees, nor was a too careful with the stamping of the snowflakes (see the half light half dark one under the deer?) LOL. But, like I said, this was a prototype and I was trying out different things. But I think this gives you an idea of how the card can open in different ways.So, there you have it. Again, I think this is an original idea. I mean not the "diorama" but my version of it. I looked at over 400 on Splitcoast and did not see anything that looked like this. However, if someone has seen something similar to this then it is not an original idea, but it was for me. . . I spent almost 8 hours on trying to get the measurements and folds just right, so if someone else had done it before me, I wish I had seen it, because it sure would have saved me a ton of time! LOLAs promised at the beginning, here are the list of supplies I used on both cards:1st card:Main tree: StampabilitiesBackground trees: Hero ArtsCorner Punch: EK SuccessMarvy liquid appliquewhite card stock: BrazilPearlsCuttlebug Swiss Dots embossing folderNesties scalloped rectanglePaper: Paper PazazzStazon Forest Green inkGlitterComputer generated sentiment.2ND card:Deer punch: Martha StewartBackground trees: Northwood Rubber Stamps; Rubber Stampede; InkadinkadoSnowflake on front: NestablitiesMoon: Nestabilities small circlePaper: Paper Pazazz (printed) white and navy blue cs: Brazil; glitter paper: DoodlebugGelly Roll silver glitter penSentiment: Hero ArtsInk: Colorbox light blue and greenSnowflake stamp: Basic GreyGemstoneAll righty then. There you go! Hope you liked them. I'm anxious to get your feedback! Don't forget to look at the pic of the week below! I'll see you on your blogs!Best,Curt O'Brien"God help me be the person my dogs think I am."
Hey All! Hope your week has started off well! Today is a very short post, but it contains a very special request at the end. So please take a minute or two to read the last part of this post if you would. On with the post.Since I only started doing this card making "thing" in April, I realized that as I progress through the holidays of the year, they are first for me as far as making cards for them. So, this is my first "winter" card. It really can't be considered a Christmas card (those will be coming!) it is just a "pre-Christmas" card! Here it is. . .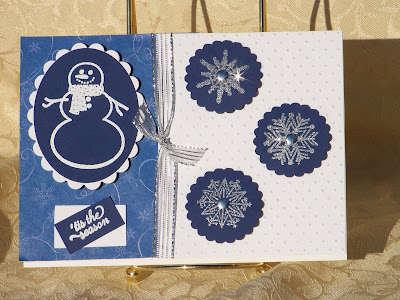 I apologize for the picture. I could not get a good shot in the direct sunlight. The snowflakes are super sparkly because they were done with silver tinsel embossing powder. The snowman is sparkly too and was done with white ep that has holographic sparkles in it. The snowflake stamps are from a set of six clear stamps that I found at WalMart in the sewing department! I have looked all over the package for a company and there is none listed! So I don't know who makes them, but all six are beautiful designs. I stamped them on navy blue Brazill cs, cut them out with scalloped Nesties, added a silver brad to the center of each and then attached them to the cs with foam dimensionals. The paper is from Hobby Lobby, and the other side I ran through my CB using the Swiss Dots embossing folder. The snowman stamp is from Stampology and the sentiment is from Martha Stewart. I stamped the image on navy blue Brazill cs and the cut it out with my nesties and matted it with another Nestie scallop. Matted it with foam squares and then added a silver metallic ribbon. I'm still in search for the perfect snowman stamp. I like this one, but I'm not crazy about it. I have looked at several company's stamps, but have not found one I like yet. The search continues. Anyway, this is my first cold weather card. I wanted it to keep it simple.Now on to something important. I was on Sharon's blog No Time To Stamp. She has a plea for help for a family who's 18 year old son enlisted in the Air Force. Shortly after, he was diagnosed with leukemia and was discharged. As you can imagine, the family is devastated with this news. To make it worse, the high cost of his treatment is hanging heavy over this family. There is going to be a benefit and a friend of the family has asked for prayers for this young man and his family. She also is asking that if you have some spare cards to send for a prize basket to be offered during this benefit. I have sent off several cards in today's mail. If you can help, please consider doing so by sending off your cards right away. The cards need to be received by November 8Th. Sorry for the short notice, but if you can help, please do so. Please click here to read more and for the email address to write to if you want to help. Please keep this young man and his family in your prayers.OK, that's it. I'm working on more cards so I'll be posting again in the next couple of days. Hope you are all well, and as always, thanks for stopping by and taking a look at my stuff! I certainly do appreciate your support! You are all the best! I'll see you on your blogs! Don't forget the pic of the week below. I just had to take this picture not so much because of the subject matter, but how the beam of light was illuminating it. It just looked magical to me. Take care!Best,Curt O'Brien"God help me be the person my dogs think I am."
Hey All! Thanks for stopping by! As promised from last post, I told you I was working on stuff to give to the neighborhood dogs for Halloween. I know, you probably think I'm nuts, but I just LOVE dogs, and the neighborhood dogs are awesome! So, here is what I put together for them. .  How cute are these? I love those little monster toy thingies. They were so perfect for the Halloween bags. Below is a close up of the tags I made for each:
 It says "Happy Howling" and the sentiment was computer generated using Word Art in Word. I then stamped the black paw print in the center. I cut them out with my oval Nesties then cut out the larger oval scallop with my Nesties. I punched a hole at the top of the tag and threaded through the "hairy" yarn and tied it to the bag. I bought the bags at Michael's and the little toys at Walmart. Below is a picture of what is actually inside each:
 LOL! These were so much fun to make! Each has the little monster squeaker toy, and they each also contain two small sacks of dog treats. One is filled with various hard treats like Scooby Snacks and all natural paw print cookies, and the other bag is filled with bright orange cheese flavored Pupcorn. If you have dogs and have not given them Pupcorn, you really need to go get some! I've not met a dog that doesn't like it. You can get it at any PetSmart store (Walmart even carries it!) and it comes in cheese, peanut butter, and cranberry flavors. My boys LOVE it, and the best thing about it is that it is a low calorie snack. Really, go get some for your fur baby! They will love you for it.Now on to a wonderful RAK card I received today from my very sweet blogging buddy, Sue Kment. Take a look at this little cutie!
 Is this amazing!?! I love this card so much! You should go take a look at her blog. She is ULTRA talented, and her coloring of the House Mouse stamps is jaw-dropping. She was the one who inspired me and helped me with coloring! Thanks Sue so much for this card. It really made my day!Well, that's it for this post. Hope you are all having a great week! I'm now going to work on Christmas cards and other projects that I have on my list, so I will be posting soon! Don't forget to look at the pic of the week. It is the pumpkin I carved for Halloween. I blurred the picture a bit to make it more spooky. I hope you like it! Thanks again for stopping by. I really do love having you here! Wishing you and your family a safe, fun-filled Halloween tomorrow! I'll see you on your blogs!Best,Curt O'Brien"God help me be the person my dogs think I am."
Hey All! As the title of this post suggests, I told a fib. However, it was unintentional. I know my last post said "the last of the Halloween cards, but I just had to post these Halloween cards that I made at the last minute for a couple of friends and family that came to my annual pumpkin carving night. I had made treat boxes for them, but then decided I wanted to make those cute stand alone pop up cards. I thought they would make cute table decorations sitting at each place. So here they are: Here are the close ups of each one
:


 These are similar to the stair step card in looks, however each is an individual scene. I like how they turned out, and they do make great place setting embellishments for the table. And yes, even though I added stand up pieces to the cards, they still fold flat to fit into envelopes!OK, this is a short post. Just wanted to share these with you. The last Halloween subject post is coming. I am working on Halloween treat bags for my favorite neighborhood dogs. You know me and dogs. . .LOL. Thanks for looking! See you on your blogs!Best,Curt O'Brien"God help me be the person my dogs thinks I am."
Hey All! Well, the time has come to stop production on the Halloween cards! I'm sad, because this is my favorite holiday, and it has been so much fun to make them! However, Thanksgiving and Christmas are fast approaching, and I need to get on those! So, today's post has my last 2 Halloween cards and a new Thanksgiving card. I also have to thank a few folks too! So, on with the cards:
My first one is one I saw on SC. It's called a stair step card and I really think they are a cute idea. When I saw them, I knew I had to make one for Halloween. Here it is:
 This was so much fun to make! I used a tag punch to create the tombstones which were punched out of cs from Daisy D's which had a great weathered stone look. Some I left in the original shape of the tag punch, others I rounded off. I decorated each with something different. The ghost and cat on the fence were pre-printed cutouts in a kit and the skull and witch were from the same set. The skeleton is an image from Inkadinkado. I stamped him with Versamark embossing ink, then embossed him with white detail ep and cut him out. The spider web and spider are from a bag of Halloween confetti. I hand made the Halloween sign and stamped the sentiment on orange cs. I used my Nesties to cut out the moon on sparkly yellow cs. I love the "3-D scene" look of these cards and have a ton of other ideas for them.
My second Halloween card was a quickie. Here it is:
 I'm not too happy with how this one turned out. It is not what I had in my head and it took on a life of its own. I just wanted the owl, branch and moon for the card, but it didn't look very "Halloweenie". So I added the pumpkins, but that didn't help, so I drew the ghost and made him "hold" the sign with the sentiment. It turned out OK, but not what I intended. I drew and cut the branches out and colored them with a black marker. The pumpkins are from the new Magenta set that Karen sent me. The owl is a Martha Stewart stamp. I cut the moon out with my Nesites. I mounted it all on black cs and used a white pen to make the dotted stars for the background.
My last card for this post is one for Thanksgiving. Here it is: I LOVE this stamp set! This is the stamp set that Karen sent me as a RAK last week. It is by Magenta and their stamps have such high quality. I stamped the images in jet black archival ink and colored them all with colored pencils and blended with oderless mineral spirits. I cut all of the images out and matted them with two different colors of cs. I then mounted those onto patterned paper (speckled). Some of the images are raised with foam tape.
Finally, this week I was given the same award by two different blogging buddies! Here it is: It was given to me by Mada who is my blogging bud in Bucharest. She is so amazingly sweet, and leaves the most wonderful comments. I love visiting her blog. Hop over and take a look.
The second person that gave it to me is my newest blogging buddy Karen over at 6 Wacky Women. I highlighted her in my last blog for sending me the fabulous RAK! I hope you've had a chance to go see her work! I am proud to list her under my favorites. One thing though, I "altered" this award. Sorry, but I used to work with a group of editors at a publishing company years ago, and it is just a habit to correct things I see that are wrong. The original text said "I Love"You" blog instead of "Your". That would have driven me nuts if I posted it on my blog and had to read that every day! LOL I know anal, anal. . . . So, I took it on over to my Adobe Photoshop and did a little altering. If you guys would like to re-copy it from here, you are welcome to do so. Anyway, I love the fact that you both thought of me, and I will display it proudly on this blog! Thank you both very much! It was sweet of you!Well, that is it for this post. I hope you know how much I appreciate you visiting! This blogging and card making can be so time consuming, and for you to take the time to come see me is so amazing to me. I so appreciate it! Don't forget the pic of the week below! I'll see you on your blogs!Best,Curt O'Brien"God help me be the person my dogs think I am"
Hey All! Thanks for coming! Today's post has a new idea for me which I'm excited to share with you! I also have to tell you about another wonderful RAK I received. So, on with the post!Lots of you have been so kind in complimenting me on my photography. It is something that I have loved doing for the past 4 years or so, and I am always looking to improve that art. When I look at some of the pictures I take, the first thought that comes to mind with some of them is "Wow, that would make a cool card!" Well, I took another one of those pictures the other day, and I decided instead of "thinking" I would use the photo as the basis of the idea for my cards. That's why I'm calling these cards "Photo Inspirations". Here is the first photograph, and then my interpretation of it as a card. . . And the card. . .
 I love this new stamp I bought (bird on weeds). It is a Penny Black, and I am getting so addicted to their stamps. I used my Cuttlebug embossing folder for the embossing, and my Nesties to do the scalloped oval. Added ribbon and the pearls, matted everything in black and mounted the bird on the weeds image with foam tape. The other bird image is by Inque.OK, the next photograph. . . I loved the colors of this tree, and how they contrasted so beautifully with the bright blue sky. The leaf colors were stunning:
 And the card it inspired. . .
 The tree stamp is another Penny Black stamp that I picked up a few days ago. The minute I saw it, I had a ton of card images in my head. I stamped the image in dark brown Colorbox ink on a speckled tanish paper, then sponged the top of the image with yellow, orange, and red Colorbox ink. I mounted it on brown and orange cs and then gave it some depth with foam tape. I cut the leaves out in the corners from a printed piece of paper and stuck them on with glue. I used the corner of a petal from a flower punch to get the corners cut then added the brads. I then stamped the acorn image onto orange cs with the same dark brown Colorbox ink. I cut it out with the scalloped Nesties, added a dark brown eyelet and attached it to the ribbon with some metallic copper cord. The acorn image is by Inkadinkado.This was so much fun to actually put the photographic image into a card form. I'm going to do this more often. If any of you would like to try this, feel free! I would love to see what you come up with on these two pictures. Give a link to your creation in the comment section below. I would love to take a look. I had thought about making these a challenge, but then I think there are so many challenge sites out there that one more would just be silly. So, if you want to play along with me, that would be great. I'm just kinda doing this to inspire some cards for me. But if my photography inspires a card for you, go for it!
Last but not least, I got the most wonderful RAK in the mail a few days ago. It came from my very new blogging friend Karen at 6 Wacky Women. You have to go see the blog! When you see the card she sent me below, you will want to jump over and take a look at all the other great creations she has posted! I had seen a card she had made featuring the stamp set she ended up sending to me as a gift, and just had to have the set! So I emailed her and said I wanted to order it. She said their store had one left and she would get it out to me. I asked her for the price and how I could pay for it, and she never answered. So, a few days later, I sent an email to her asking again how much and how to pay for it. The little sneak emailed me back and said she hadn't gotten around to typing up an invoice, but she would send it soon. A few days later the package arrived and it had THE MOST ADORABLE CARD included with the stamp set stating that it was a gift to thank me for telling people about their blog. I was stunned, then burst out laughing that she had me fooled the whole time! Thanks so much Karen and Cathy! I can't tell you how much I appreciate your thoughtfulness! The card and the stamp set are below: Is this not adorable????
 Look at that little face!!!!Here is the stamp set she sent me:
 It's by Magenta and it is called a puzzle stamp. Is it not wonderful??? I'm a lucky guy! Well, that's it for this post. Hope you enjoyed it! Don't forget the pic of the week. I just have to be a proud dad and post this year's Autumn picture of my boys. Take care all, and I'll see you on your blogs!Best,Curt O'Brien"God help me be the person that my dogs think I am."